
How to Identify and Repair Paint Chips on Your Car
Having paint chips on your car can be an eyesore and detract from its overall appearance. Fortunately, there are a few steps you can take to identify and repair paint chips on your vehicle, and learn how to fix paint chips on car:
- First, it is important to identify the type of damage that has occurred. Paint chips are usually caused by small stones or other debris hitting the surface of the car at high speeds. This type of damage will appear as small circular marks in the paintwork, often with a raised edge around them. If you notice any other types of damage such as scratches or dents, these may require different methods for repair. For help fixing any panel damage, visit NRC Group.
- Once you have identified that the damage is indeed caused by paint chips, it is time to begin repairs. The first step is to clean the area thoroughly with soap and water before drying it off completely with a soft cloth or paper towel. Once dry, use a fine-grit sandpaper to lightly sand down any raised edges around the chip until they are flush with the surrounding area.
- Next, apply primer over both the chip and surrounding area using a brush or spray gun if available; this will help ensure an even finish when painting later on. Allow this primer coat to dry completely before moving on to painting; use either touch-up paint from an auto parts store (or the best online auto parts stores) or spray cans for larger areas if necessary.
- Apply several thin coats rather than one thick one in order to achieve better results; allow each coat time to dry before applying another one until desired coverage is achieved then leave overnight for best results before buffing out any imperfections using rubbing compound and polishing wax afterward if desired for extra shine and protection against future wear and tear!
By following these steps carefully you should be able to successfully identify and repair any paint chips on your car quickly and easily, in addition to getting a good grasp of how to fix chipped paint on your car (and this could apply to other issues too, such as trying to learn how to fix peeling paint on your car)!
What You Need to Know About Touching Up Paint Chips on Your Car
Touching up paint chips on your car is an important part of maintaining its appearance. It can help to protect the metal from rust and corrosion, as well as improve the overall look of your vehicle. However, it is important to understand how to properly touch up paint chips, as well as how to fix paint chips on car, to ensure that you do not cause any further damage or create a worse appearance than before.
The first step in touching up paint chips on your car is to clean the area thoroughly with soap and water. Even something like Simple Green to wash your car will do just fine. This will remove any dirt or debris that may be present and allow for better adhesion of the new paint.
Once this has been done, use fine-grit sandpaper to lightly sand down the edges of the chip until they are smooth and even with the surrounding area. This will help ensure that when you apply new paint, it will blend in seamlessly with its surroundings.
Next, use a primer specifically designed for automotive applications over both the chip itself and around its edges so that it adheres properly when you apply new paint later on. Once this has dried completely (usually within an hour), you can then begin applying touch-up paints using either a brush or aerosol spray can depending on what type of finish you desire for your vehicle’s exterior surface.
When applying these paints, make sure to feather out each stroke so that there are no visible lines between them once dry; this will help create an even finish across all areas touched up by hand or spray can alike!
Finally, after allowing all newly applied paints ample time (at least 24 hours) to dry completely before driving off again; waxing over these areas may also be beneficial in order to protect them from further wear and tear due to weather conditions such as rain or snowfall throughout winter months ahead!
With proper care taken during each step outlined above – touching up paint chips on your car should be relatively easy while also providing great results!
The Best Way to Fix Small Paint Chips on Your Vehicle
Small paint chips on your vehicle can be unsightly and detract from the overall appearance of your car. Fortunately, there are a few simple steps you can take to repair these chips and restore the look of your car, as you learn how to fix paint chips on car.
- The first step is to clean the area around the chip with a soft cloth or brush. This will remove any dirt or debris that may have accumulated in the chip, which could prevent proper adhesion of any repair materials.
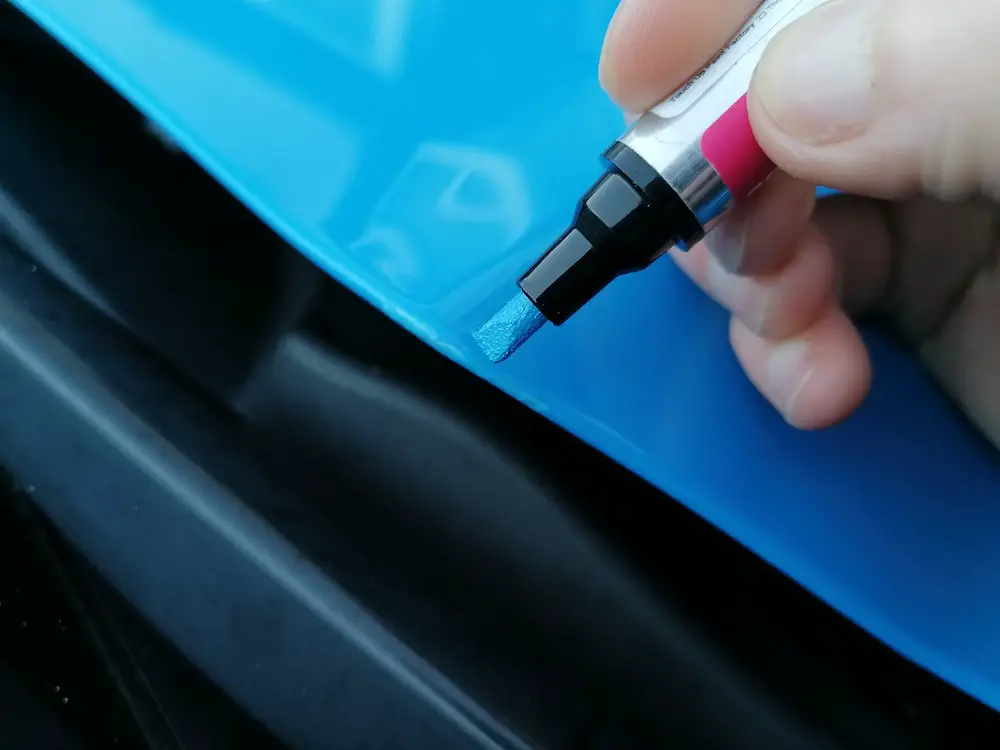
- Next, use a small brush to apply touch-up paint directly into the chip. Make sure to use an exact match for your vehicle’s color code so that it blends in seamlessly with the surrounding paint job. Allow this coat of paint to dry completely before proceeding further.
- Once dry, apply a clear coat over top of the touch-up paint using either an aerosol spray or brush-on applicator depending on what is available at your local auto parts store. This will help protect against further damage and ensure that all repairs blend in with existing colors perfectly.
- Finally, buff out any excess clear coat using a soft cloth or buffer pad (if you need some references, make sure you understand beforehand how to buff a car) until you achieve an even finish across all areas affected by chipping paint. With these simple steps, you can easily fix small chips on your vehicle and restore its original beauty!
DIY Tips for Repairing Large Paint Chips on Your Car
If you have noticed large paint chips on your car, it is important to repair them as soon as possible. Not only can these chips make your car look unsightly, but they can also lead to rust and corrosion (such as deep rust vs surface rust) if left untreated.
Fortunately, repairing large paint chips and understanding how to fix paint chips on car is a relatively simple process that you can do yourself with the right materials and tools.
- To begin, you will need to gather the necessary supplies for the job. This includes a bottle of touch-up paint that matches the color of your vehicle, fine-grit sandpaper (400 or higher), rubbing alcohol or wax and grease remover, masking tape, a clean cloth or rag, and some wax or sealant for protection after the repair is complete.
- Once you have all of these items ready to go, start by cleaning off any dirt or debris from around the chip using rubbing alcohol or wax and grease remover. Then use masking tape to cover any areas around the chip that should not be painted over. Next use sandpaper to lightly sand down any rough edges to create an even surface for painting later on.
- Now it’s time for painting! Shake up your touch-up paint before applying it directly onto the chip with a small brush or cotton swab until it is completely filled in with color. Allow this layer of paint to dry completely before adding another coat if needed; usually, two coats are sufficient for covering up larger chips effectively without creating an uneven finish when dry.
- Finally, once everything has dried properly apply some wax or sealant over the top to protect against further damage from weathering elements such as rain and sun exposure which could cause fading over time if left unprotected. With this final step completed, you should now have successfully repaired those large paint chips on your car!
How to Choose the Right Automotive Touch-Up Paint for Repairs
When it comes to repairing minor scratches and chips in your vehicle’s paint, touch-up paint is an essential tool. However, choosing the right automotive touch-up paint for your repairs can be a daunting task. To ensure that you make the best choice for your car, here are some tips to consider when selecting automotive touch-up paint.
First, you should always match the color of the touch-up paint to that of your vehicle’s original finish. This can be done by obtaining a code from either the manufacturer or dealer that will identify the exact color of your car’s exterior. Once you have this code, you can purchase a matching color from an auto parts store or online retailer.
Second, it is important to select a high-quality product when purchasing automotive touch-up paint. Look for paints with good coverage and adhesion properties so that they will last longer and provide better results than cheaper alternatives. Additionally, make sure that any primer or clear coat used in conjunction with the base coat is also of good quality so as not to compromise its durability over time.
Finally, consider using aerosol cans instead of bottles if possible as they are easier to apply and provide more even coverage than brush-on paints do. Additionally, aerosol cans come with their own built-in applicator which makes them ideal for small repair jobs such as chips and scratches on bumpers or door panels where precision is key.
By following these tips when selecting automotive touch-up paint for repairs on your vehicle’s exterior finish, you can ensure that you get great results every time without compromising the quality or longevity of the repair job itself!
The Pros and Cons of Professional vs DIY Auto Body Repairs for Paint Chip Damage
The decision to repair paint chip damage on a vehicle can be a difficult one, once you’ve figured out what it takes when knowing how to fix paint chips on car. Should you take it to a professional auto body shop or attempt the repair yourself? Both options have their pros and cons, and understanding them can help you make an informed decision.
One of the main advantages of taking your car to a professional auto body shop is that they will use high-quality materials and tools for the job. Professional technicians are also trained in proper techniques for repairing paint chips, so you can be sure that the job will be done correctly. Additionally, if there is any additional damage caused by the repair process, most shops offer warranties on their workmanship.
On the other hand, DIY repairs may save you money in terms of labor costs but may not produce as good results as those achieved by professionals. You will need to purchase all necessary materials yourself and ensure that they are compatible with your vehicle’s paint type before beginning any repairs.
Furthermore, if something goes wrong during your DIY project, it could end up costing more than if you had taken it to an auto body shop (or looking around for the best cheap auto body shop near me) in the first place due to additional parts or labor needed for repairs or replacements.
In conclusion, when deciding whether to take your car into an auto body shop or attempt DIY repairs for paint chip damage yourself, consider both options carefully before making a decision. After all, you do need to take into account the cost to repair a paint chip on your car.
Professional services may cost more upfront but could save time and money in the long run due to better results and warranties offered by most shops on their workmanship. On the other hand, DIY projects may require more effort from you but could save money depending on how successful your project turns out in comparison with professional services
How to Protect Your Vehicle from Future Damage After Fixing a Paint Chip Problem
If you have recently fixed a paint chip problem on your vehicle, it is important to take steps to protect it from future damage. Here are some tips for protecting your vehicle from further damage:
1. Regularly wash and wax your car. Washing and waxing your car regularly will help protect the paint job from dirt, dust, and other debris that can cause scratches or chips in the paint. Waxing also helps create a protective layer over the paint that will make it more resistant to damage. Even better, you might even consider a ceramic coat.
2. Park in covered areas when possible. Parking in covered areas such as garages or under trees can help protect your car’s paint job from direct sunlight, which can cause fading and discoloration over time.
3. Avoid driving on rough roads or through construction zones whenever possible. Driving on rough roads or through construction zones increases the risk of rocks hitting your car’s body, which could cause chips in the newly-repaired area of the paint job as well as other parts of the vehicle’s exterior surface area.
4. Invest in a quality clear coat sealant for added protection against UV rays and other environmental elements that could potentially harm your vehicle’s exterior finish over time if left unprotected. Clear coat sealants provide an extra layer of protection against UV rays, dirt, dust, bird droppings, tree sap, acid rain, etc., all of which can contribute to fading and discoloration if not properly protected against.
Following these tips will help ensure that you get the maximum life out of any repairs made to your vehicle’s exterior finish while also helping prevent future damage caused by environmental elements such as sun exposure, dirt, dust, etc.
Common Mistakes People Make When Trying To Fix Their Own Car’s Paint Chip Damage
1. Not Cleaning the Area Properly: Before attempting to fix paint chip damage, it is important to clean the area thoroughly. This includes removing any dirt, debris, or contaminants that may be present on the surface of the car. If these are not removed, they can interfere with the repair process and lead to further damage.
2. Not Applying Primer: Primer is an essential step in repairing paint chip damage as it helps create a smooth surface for painting and provides a better bond between the paint and the car’s bodywork. Without primer, there is a greater risk of peeling or flaking after the painting has been completed.
3. Using Too Much Paint: When applying touch-up paint to repair chips in your car’s finish, it is important not to use too much paint as this can cause runs or drips which will be difficult to remove without damaging your vehicle’s finish further. It is best practice to apply several thin coats rather than one thick coat when repairing chips in your car’s finish.
4. Not Sanding Smoothly: After applying touch-up paint, it is important that you sand down any rough edges or bumps created by brush strokes before polishing and waxing your vehicle’s finish for protection against future damage from UV rays and other environmental factors such as rain or snowfall. If you do not sand down these areas properly before waxing them off, they will remain visible on your vehicle’s finish even after polishing.
5. Not Waxing After Repair: Once you have finished repairing chips in your car’s finish, it is essential that you apply a layer of wax over the top of them for protection against future environmental factors such as UV rays, rain, snowfall, etc. Without this layer of protection, there will be an increased risk of further chipping occurring due to exposure to these elements.
Q&A
1. What is the best way to fix paint chips on a car?
The best way to fix paint chips on a car is to use touch-up paint that matches the color of your vehicle. You can purchase this from an auto parts store or online. Make sure you clean and sand the area around the chip before applying the touch-up paint, and then apply several thin coats until it blends in with the surrounding area.