
- Guide to Putting on Jumper Cables
- How to Safely Connect Jumper Cables
- Know Before Using Jumper Cables
- Tips for Avoiding Common Mistakes
- Knowing How to Put On Jumper Cables
- Common Problems with Connections
- How To Choose the Right Size and Type
- Safety Precautions When Using and Storing
- Q&A
Step-by-Step Guide to Putting on Jumper Cables
Here’s a guide on how to put on jumper cables:
1. Park the two vehicles close together, but make sure they do not touch.
2. Turn off both engines and all electrical components in both cars.
3. Open the hoods of both cars and locate the batteries in each vehicle.
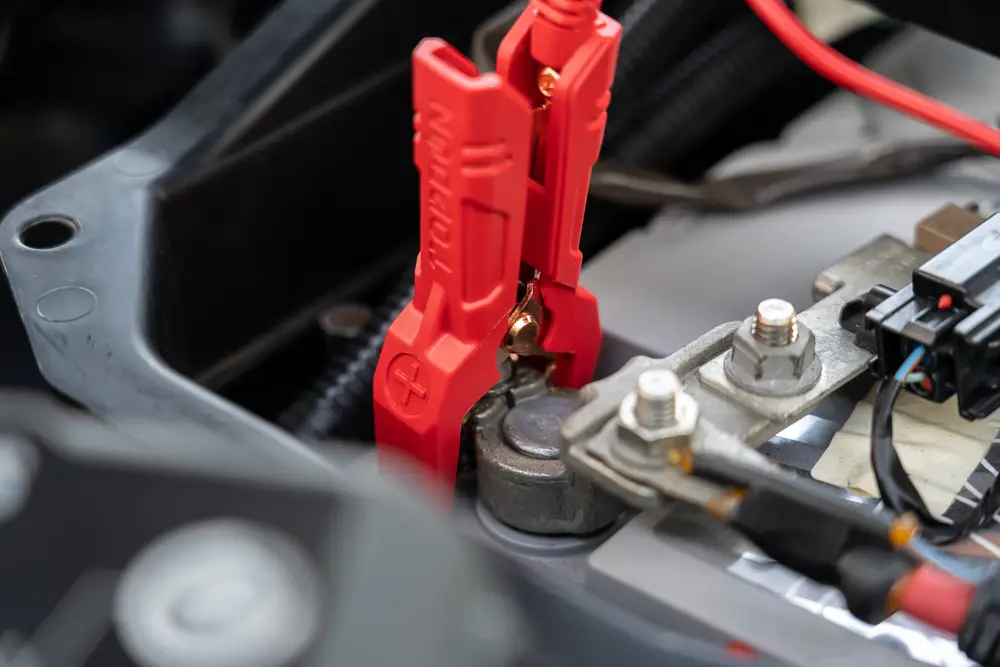
4. Connect one red clamp to the positive terminal of one battery, then connect the other red clamp to the positive terminal of the other battery (for more insight, check out our guide on jumping cables positive and negative).
5. Connect one black clamp to the negative terminal of one battery, then connect the other black clamp to a metal part on either car that is not connected directly to either battery (such as an unpainted bolt or bracket).
6. Start up each engine and let it run for a few minutes before disconnecting all clamps in reverse order (black first, then red – check out our explainer on how long to jump a car to learn more).
7. Close both hoods and you are done.
How to Safely Connect Jumper Cables for Maximum Efficiency
Jumper cables are a useful tool for jump-starting a car with a dead battery (or learning how to jump a starter motor and whether can you jumpstart a car with a bad alternator). However, it is important to use them correctly to ensure maximum efficiency and safety. The following steps will help you safely connect jumper cables for maximum efficiency:
1. Park the two vehicles close together, but make sure they do not touch each other. Turn off both engines and all electrical accessories in both cars (unless you need to figure out how to jump a car without another car).
2. Put on protective gloves and eyewear before handling the jumper cables to protect yourself from electric shock or sparks that may occur during the process of connecting the cables.
3. Connect one end of the red (positive) cable clamp to the positive terminal of the dead battery, then connect the other end of this same cable clamp to the positive terminal of the working battery (the donor vehicle).
4. Connect one end of the black (negative) cable clamp to the negative terminal on the working battery, then connect the other end of this same cable clamp onto an unpainted metal surface away from any moving parts on the dead vehicle’s engine block or frame – not onto negative terminal on the dead battery itself. This will help prevent sparks from occurring near any flammable liquids or vapors that may be present in either engine compartment area due to leaking fuel lines etc. Make sure clamps are firmly attached so they don’t come loose during the jump-starting process.
5. Start up the donor vehicle first and let it run for several minutes before attempting to start up the dead vehicle – this will allow enough charge time for a weak/dead battery so it can accept a charge from the donor vehicle’s alternator when you attempt to start up.
6. Once enough charge has been built up in the weak/dead battery, turn off the donor car and try starting up a dead car – if successful remove jumper cables in reverse order as connected originally – first disconnect the black (negative) cable clamps followed by red (positive) ones – making sure no sparks occur near flammable liquids or vapors present either engine compartment area due leaking fuel lines, etc.
7. Finally take your car out for a short drive around the block after a successful jump-start – this will help recharge its own internal charging system which should bring back its normal operating condition soon afterward.
Following these steps carefully will ensure that you safely connect your jumper cables for maximum efficiency when jump-starting your car with a dead battery.
What You Need to Know Before Using Jumper Cables
Jumper cables are a useful tool for jump-starting a car battery, but it is important to understand how to use them safely and correctly. Before attempting to use jumper cables, there are several things you should know.
- First, make sure the car with the dead battery is in park or neutral and that both cars have their parking brakes engaged. It is also important to ensure that both cars have compatible batteries; if one has a 12-volt battery and the other has a 6-volt battery, they cannot be connected together. Additionally, check that all of the connections on your jumper cables are secure before proceeding.
- When connecting the jumper cables, start by attaching one end of the red cable (positive) to the positive terminal on the dead battery and then attach one end of the black cable (negative) to the negative terminal on the good battery. Next, connect the remaining ends of each cable: the red cable should be attached to the positive terminal on a good battery the and black cable should be attached away from both batteries onto an unpainted metal surface such as an engine block or frame rail for grounding purposes.
- Once all connections are made securely, start up a vehicle with a good battery first and then try starting a vehicle with a dead battery; if it does not start after several attempts you may need additional assistance from a professional mechanic or tow truck service provider. After a successful jump-start removes cables in reverse order: first disconnect the black cable from the ground surface followed by the red cable from the positive terminal on the good car’s battery lastly disconnect the remaining ends of each cable from the respective terminals on the dead car’s battery.
- Finally, it is important to note that using jumper cables incorrectly can cause serious damage so always consult your owner’s manual before attempting any repairs yourself or seek help from qualified professionals when necessary.
Tips for Avoiding Common Mistakes When Connecting Jumper Cables
1. Make sure the vehicles are not in contact with each other. This is important to avoid short circuits and sparks that can cause damage to both vehicles.
2. Check the battery terminals of both cars for corrosion or dirt before connecting the cables. Clean them off if necessary, using a wire brush or baking soda and water solution.
3. Connect one end of the red cable to the positive terminal of the dead battery, then connect the other end to the positive terminal of the working battery.
4. Connect one end of the black cable to the negative terminal on the working battery, then connect another end to an unpainted metal surface on the dead car (not near the battery).
5. Start the engine on the working car first and let it run for a few minutes before attempting to start the dead car’s engine; this will help charge up the dead battery so it can start more easily when you try again later on if needed.
6. Once you have started both engines, disconnect cables in reverse order: black cable from the unpainted metal surface first, then the red cable from the positive terminal on the working car last.
7. Make sure all connections are secure and tight before starting either vehicle; loose connections can cause sparks which could lead to fire or explosion.
The Benefits of Knowing How to Put On Jumper Cables
Knowing how to put on jumper cables is an important skill for any driver. Jumper cables are a simple and effective way to jump-start a car when the battery has died. Having this knowledge can save time, money, and frustration in the event of a dead battery.
- The first step in using jumper cables is to locate another vehicle with a working battery that can be used as the power source. Once both vehicles are parked close together, turn off all electrical components in both cars and set the parking brakes. Open both hoods and locate each car’s batteries; they should be marked with positive (+) and negative (-) signs.
- Next, attach one end of the red (positive) cable clamp to the positive terminal of the dead battery; then attach one end of the black (negative) cable clamp to the negative terminal of the working battery. Connect other ends of clamps accordingly: red clamp on the positive terminal of the working battery; black clamp on the negative terminal or metal part near the dead battery (not directly onto it). Make sure clamps are securely attached before starting either vehicle’s engine.
- Once clamps are connected, start the engine on the working vehicle first; then start the engine on the dead vehicle after about 30 seconds have passed – this will allow enough time for a charge from the working vehicle’s alternator to reach the dead car’s starter motor before attempting to start it up again. If successful, leave engines running for several minutes while charging takes place before disconnecting clamps in reverse order: black first followed by red last – make sure not to touch any metal parts while doing so as sparks may occur due to electricity still present in the system even after engines have been turned off again.
- Finally, if jump-starting was successful but the problem persists or recurs shortly afterward then it is likely that there is an underlying issue with either car’s electrical system (such as how you have a new battery but the car won’t start without a jump) which needs further investigation by a qualified mechanic or technician who can diagnose the cause correctly so appropriate repairs can be made accordingly.
Knowing how to put on jumper cables correctly can save you time and money when your car’s battery dies unexpectedly – not only does it allow you to get back out onto the road quickly but also helps avoid costly tow truck fees associated with having someone else do the job instead.
With just a few simple steps outlined above anyone should be able confidently to use their set jumper cables next time they find themselves stranded roadside due to flat or drained batteries – so don’t forget to practice these instructions regularly to ensure you’re always prepared to handle such situations yourself without needing rely on outside help.
Troubleshooting Common Problems with Jumper Cable Connections
Jumper cable connections are a common way to jump-start a car when the battery is dead. However, if the connection is not done properly, it can cause serious damage to both vehicles. To ensure that your jumper cable connection is successful and safe, here are some tips for troubleshooting common problems (such as how your car won’t start with a jump).
- First, make sure that you have connected the cables correctly. The red cable should be attached to the positive terminal of one battery and then to the positive terminal of the other battery. The black cable should be attached to the negative terminal of one battery and then to an unpainted metal surface on the engine block or frame of either vehicle (not another battery). If these connections are reversed, it can cause sparks or even an explosion.
- Second, check that all clamps are securely fastened onto their respective terminals so that there is no risk of them slipping off during use. If any clamps appear loose or corroded, replace them with new ones before attempting a jump-start.
- Thirdly, make sure that all cables remain as far away from moving parts as possible while in use; this includes fan belts and pulleys which could snag on exposed wires and cause damage or injury if they come into contact with them during operation.
- Finally, inspect both batteries for signs of corrosion or leaking fluid before attempting a jump-start; if either appears damaged in any way then do not attempt a jump-start until they have been replaced by qualified personnel.
Following these simple steps will help ensure your jumper cable connection is successful and safe every time you need it.
How To Choose the Right Size and Type of Jumper Cable for Your Vehicle
When it comes to jump-starting a vehicle, having the right size and type of jumper cable is essential. The wrong size or type of cable can cause damage to your vehicle’s electrical system, so it is important to choose the correct one for your specific make and model.
- The first step in choosing the right jumper cable is determining the size you need. Generally speaking, most vehicles require 4-gauge cables that are at least 20 feet long. However, some larger vehicles may require 6-gauge cables that are 25 feet long or longer (make sure you know the best gauge for jumper cables). It is best to consult your owner’s manual for specific recommendations on what size and length of cable you should use for your particular vehicle.
- The next step in selecting a jumper cable is deciding which type you need. There are two main types: standard and heavy-duty. Standard cables are typically made from copper wire with plastic insulation and can handle up to 600 amps of current flow without overheating or melting down. Heavy-duty cables are usually made from aluminum wire with rubber insulation and can handle up to 1000 amps of current flow without any issues. Again, it is best to consult your owner’s manual for specific recommendations on which type of cable you should use for your particular vehicle model before making a purchase decision.
- Finally, when purchasing jumper cables be sure they come with clamps that fit securely onto both battery terminals without slipping off during use as this could cause serious damage if not done properly. Additionally, look for clamps that have insulated handles so they don’t shock you while connecting them onto the battery terminals during use as well as ones that have an indicator light so you know when power has been successfully transferred between batteries during jump starting operations safely and efficiently.
In conclusion, choosing the right size and type of jumper cable for your vehicle requires careful consideration based on its make/model specifications outlined in its owner’s manual before making a purchase decision. Doing so will ensure safe operation while jump-starting operations take place successfully every time.
Safety Precautions When Using and Storing Your Jumper Cables
When using and storing jumper cables, it is important to take certain safety precautions in order to avoid injury or damage.
- First, always make sure that the car you are jump-starting is turned off and the keys are removed from the ignition. This will prevent any sparks from occurring when connecting the cables.
- Second, ensure that both cars have their hoods open before connecting the cables. This will allow for better access to both batteries and reduce any risk of fire or explosion due to a build-up of gas fumes.
- Third, connect one end of each cable to its respective battery terminal (positive on positive and negative on negative). Make sure that all connections are secure before attempting to start either vehicle.
- Fourth, once connected, start the working vehicle first and then attempt to start the dead battery vehicle second. Do not rev up the either engine while connected as this could cause an electrical surge which could damage both vehicles’ electrical systems or even cause a fire if there is a gas leak present in either car’s engine compartment.
- Finally, when finished with your jumper cables be sure to store them properly in a dry place away from extreme temperatures or moisture which can corrode them over time making them less effective for future use. Additionally, check your cables periodically for signs of wear such as frayed wires or exposed metal which can lead to short circuits if used again without repair or replacement first.
Q&A
1. What do I need to put on the jumper cables?
A: You will need two sets of jumper cables, a working vehicle with a good battery, and safety gloves.
2. How do I connect the jumper cables?
A: First, make sure both vehicles are turned off and in park or neutral. Connect one end of the red cable to the positive (+) terminal on the dead battery and then connect the other end to the positive (+) terminal on the working battery. Then connect one end of the black cable to the negative (-) terminal on the working battery and then connect another end of the black cable to an unpainted metal surface away from both batteries (like a bolt).
3. What should I do after connecting the jumper cables?
A: After connecting all four ends of your jumper cables, start up your working vehicle first and let it run for several minutes before attempting to start up your dead vehicle. This will allow enough power from your working vehicle’s battery to jumpstart your dead car’s engine.
4. How long should I leave my car running after jumpstarting it?
A: It is recommended that you leave your car running for at least 15 minutes after jumpstarting it for its alternator to recharge its own battery as well as any other electrical components that may have been drained during starting up process.
5. Is there anything else I should be aware of when using jumper cables?
A: Yes. Make sure you never let either set of clamps touch each other while they are connected or else you could cause sparks which can lead to an explosion or fire hazard. Also, make sure that all connections are secure before attempting any kind of start-up procedure with either vehicle involved in this process.
6. Can I use my own car’s battery instead of another person’s car’s battery when jumpstarting my own car?
A: Yes, but only if you have two sets of functioning jumper cables available so that you can safely attach them between both batteries without causing any sparks or explosions due to the risk associated with improper connection techniques.
7. What should I do if my engine still won’t turn over after jumping it off another person’s car’s battery?
A: If this happens, then it is likely that there is something wrong with either your starter motor or alternator which would require professional attention from a qualified mechanic to them diagnose what exactly is wrong with these components so they can be repaired accordingly.
8. Is there anything else important about using jumper cables that people should know about before attempting this task themselves?
A: Yes – always remember safety first when dealing with electricity by wearing protective gloves while handling any type of wires/cables involved in this process as well as making sure all connections are secure prior to starting up either vehicle involved here.