Summertime can be a difficult season, especially if you are running your car without air conditioning. But, was your air conditioning system empty and you tried to refill the system before you ended up with overcharged AC by accident? Well, in this guide, we’ll detail the key symptoms and causes of an overcharged AC unit in your car.
- What Is The Air Conditioner?
- How Does A Car’s AC Unit Work?
- What Does The Refrigerant Do?
- AC Unit Power Consumption
- Overcharged AC Symptoms
- Overcharged AC Causes
- AC Pressure Gauge Readings
- Purging An Overcharged AC Unit
- How To Recharge A Car’s AC Unit
- How To Replace The AC Compressor
- Conclusion
- Frequently Asked Questions (FAQs)
Personally, I ended up with overcharged AC a few times and it was terrible for the car. The worst thing about doing it yourself is that you don’t know how much Freon you need in your AC system (and want to figure out how to check Freon in car and how to put Freon in car). This can cause some overfilling issues.
Also, air can be trapped inside the AC system. If there is air and you fill it with Freon, you can expect your air conditioning system to not work properly. If you drive your car with an overcharged AC system, the compressor undergoes a lot more strain.
Here, we are going to cover the cost to charge the AC system and how to purge the system of extra gas. Not to mention, listing out the AC pressure readings, how to recharge your car’s AC unit, and how to replace the AC compressor.
What Is Car AC

The AC – or air conditioning – system, helps you out by cooling your car during those hot summer days. Life would be pretty tough without it, otherwise.
Thankfully, engineers have thought about this problem and they have started implementing cooling solutions in cars. The AC systems became an instant hit in the 50s. They were very expensive when they were introduced into the market. For the most part, only the rich could afford the option to get a vehicle with a working AC system.
But now, 70 years later, things have changed pretty drastically. The automotive AC system is a standard component on almost every vehicle out there on the roads today.
There are still some cars without an AC system installed. But these cars are pretty rare and most drivers are driving cars fitted with air conditioning, including me.
AC not only allows you, as the driver, to enjoy comfort. However, it also improves your focus. You don’t have a loss of focus or distractions during those long and hot summer days.
You basically are protected from all that heat that is out there and you can enjoy your time while driving. Some people do not prefer air conditioning. But most drivers like the idea of being cooled and to enjoy the breezy comfort.
How Does A Car AC Work
As we said, the AC system not only cools you in the summer. It also helps you not lose focus. There have been accidents during the summer due to the heat causing discomfort to the driver. This could’ve been prevented with these AC systems and more such cases will be prevented in the future.
Also, a good addition to an AC unit would be tinted car windows. With tinted windows, you will be even more comfortable as the sun will not hit your eyes directly and cause a distraction. But here also lies the danger of overcharged AC.
As for how the AC works, it’s pretty simple. The car’s AC is a closed system and its core is the compressor. This air conditioning compressor is then connected to a condenser which is located at the front of the vehicle. From this condenser, the cool gas travels into the cabin.
So, everything starts with the compressor. By turning the air conditioning system, you engage the AC compressor. As the compressor spins and the pistons which are inside this system start to do their work by compressing the gas that is inside the compressor.
From here, this is when the gas is starting to move out of the compressor. It reaches a temperature of around 185 degrees Fahrenheit and with 232 psi of pressure or 16 bars.
Car AC Cooling Process
From the compressor, the gas travels to the condenser which is located next to the front radiator. And during its travel, the gas loses its heat and turns back to liquid.
Then this liquid travels into the dryer. This dryer is in charge of not letting any excess gas travel to the cabin. So, only the liquid travels into the next step of the process.
The liquid travels and reaches the thermal expansion valve. And when it hits the expansion valve, it then turns into a gas, and the temperature drops to 32 Fahrenheit.
Following this, the gas goes to a device that is called an evaporator. This evaporator is similar to a radiator. But in this device, the gas passes through, and then the fan starts kicking in.
Once the fan in the car starts to blow into this evaporator, the cool air will start to flow inside the cabin. At this stage, the gas completes its travel in the evaporator. Next, it goes again into the compressor and the whole process is repeated until your turn off the air conditioning system.
Putting Freon In A Car
Many of the vehicles at the time were using Freon as a refrigerant, which is also known as R22. The Freon was introduced back in 1928 by Thomas Midgley Jr, as the first non-flammable and non-toxic gas. The name Freon is a trademark that was used by DuPont and marketed its refrigerants under this name for many years.
This refrigerant was widely used in cars and homes until it was discontinued back in 2004. This discontinuation was because of its negative impact on the environment and its ozone-depleting substances. That’s why appliances that were reliant on the R22 were phased out over time.
The refrigerant of choice now is R-410A. The R22 Freon standard is still in production, but as of 2021, its production will eventually end.
You can find this R-410A refrigerant under many names. Primarily, you can find it as Puron, while other names include SUVA 410A, GENETRON AZ-20, and Forane 410A.
If you are running an R22 refrigerant, you will have to retrofit your vehicle to run the ozone-friendly R-410A which will become a standard by 2021.
AC Power Consumption

The AC also requires power to run the compressor. This power demand, although some claim that is around 4 hp, is actually quite a lot. This is especially if you are running a smaller displacement vehicle.
This AC system can diminish your engine power pretty easily if you have a 1.6-liter or lower displacement engine.
It can easily steal 10-20 horsepower from your engine’s total output and could slow down the car. This means that your engine will become sluggish and is not going to be happy. That’s why if you are planning to get a car that you are going to use the air conditioning a lot, it’s a good idea to get an engine that is more capable of running these accessories.
This is important because you will need the power to overtake. And in some situations when the AC is on, you will not have that ability at your disposal. And this can potentially get you in an accident on the road.
That’s why you should keep this in mind. Or if you have an overcharged AC (in which case, you can figure out how to evacuate car AC system), it can also make your car run badly since the AC compressor is going to be overloaded.
This overloading will develop overcharged AC symptoms. And we are going to cover these symptoms next in great detail for you to know what you can expect if you accidentally overcharged your AC system with refrigerant.
Overcharged AC Symptoms
As with other components when they are not working properly, the case is similar to the AC system. If you overcharge it. It’s going to develop some problems. These problems can be frustrating because you are sure that you put the right amount of refrigerant in the system but you still somehow ended up with overcharged AC.
This may be because you are getting those refrigerants for cheap that have fake gauges to measure their volume. These are not accurate and do not tell you the right quantity. You basically are fooled by this tool and you overfill the AC by accident.
That’s why you should pay attention to where you get these tools from and make sure they work. Because most of them don’t. That’s why visiting a shop that can recharge the AC system for you is a better idea (or if you want to learn for yourself on how to charge AC system or how to recharge AC and how to recharge AC in car).
Nevertheless, if you are experiencing some of these symptoms you are probably running your car with overcharged AC system. And now we are going to discuss them one by one, so you can have a clear understanding of these symptoms.
Overcharged AC, Symptoms #1: Air Conditioning Is Not Turning On
In some cases, if you have overcharged AC and you overcharged the AC too much, it will not start at all.
This is because the air conditioner is capable of detecting when there is too much refrigerant inside of it. This is a failsafe to prevent possible damage that can occur to it. It basically doesn’t turn on at all. This is the case also when the AC system is completely empty. So, to diagnose the real culprit, you need to test your system for leaks.
Because maybe you have a leaking AC system. If the system doesn’t hold the refrigerant, it will start to release it into the atmosphere and also result in the AC not turning on.
In this case, the best thing to do is to visit a shop that works and is familiar with these units to test your system. If it’s full, they will purge the system and empty it of the extra refrigerant. Or if it’s leaking, they will perform a test on it to better understand where the refrigerant is leaking.
Overcharged AC, Symptoms #2: Lack Of Cool Air
In some cases when the system is overfilled with refrigerant, it may cause some lack of cooling. This is because the system is full of refrigerants.
It means that the system doesn’t have the amount of space required for this extra refrigerant to depressurize. Therefore, all of the AC piping is filled with refrigerant and the normal conversion from liquid to gas cannot take place. The air conditioning system is basically clogged.
If you have this symptom, you will notice how your system does not produce enough cool air. That’s even if you set the air conditioner to a low temperature.
You may also confuse this symptom with a lack of refrigerant. Because if you lack refrigerant, you will also get warm air from the air vents.
In this case, the best solution is to measure the amount of refrigerant and see the real amount there. If there is too much refrigerant, the system has to be purged until it reaches the right amount of refrigerant and you don’t have overcharged AC anymore.
If there is a lack of refrigerant, on the other hand, you will have to add some extra refrigerant until you reach the proper amount of refrigerant in the system.
Overcharged AC, Symptoms #3: High Pressure On Gauge

If you have connected a gauge that comes with the refrigerant, you might notice that the readings are a bit high. In this case, you most likely have an overcharged AC with high pressure inside.
You can try to use the gauge and purge the system until you get the proper reading from the gauge. But it is unfortunate that the cheap gauges that come with these DIY recharge kits are very unreliable and don’t work very well. It is a good idea to get a more reliable gauge for you to have a better understanding of the condition inside of your AC system.
These may be more expensive but they are worth it in my opinion. Or visit a shop where they can measure the amount of gas that is inside and will purge the system if there is a need to do so. This may be more expensive, but you don’t fill your system with refrigerant every day.
Overcharged AC, Symptoms #4: Engine Running Too Hard
If you have an overcharged AC and the system is working, your engine will probably not like this. It will have a hard time keeping the coolant conversion process from liquid to gas in working order. Since the engine works harder. It means that more power will be required from the engine to keep the engine running. This will result in poor fuel economy.
Your MPG will most likely drop significantly under these circumstances. You will lose more than 5 MPG for sure. You are already losing MPG with regular driving, but in this situation, the MPG loss will be even greater.
This situation will also reduce the engine power by a lot. You will probably lose 10-30 hp if you continue driving with overcharged AC. This will result in poor acceleration and poor driving capability. You will be barely able to pass anyone on the roads with this AC working poorly.
That’s not to mention the stress that is applied to the accessory belt that is spinning the compressor. If the belt is in bad shape. It can even snap the belt in pieces and cut the power to all of the accessories that are powered by this belt. Some examples include the power steering or supercharger if you have one.
Overcharged AC, Symptoms #5: Damaged Compressor
Be mindful if you continue driving with an overly concentrated amount of refrigerant in your cooling system. Your compressor is eventually going to fail or some leaks will start to appear in the AC lines.
The compressor will be hugely overloaded and the seals that are inside of it, as well as the pistons that are compressing the gas, will get damaged. This damage will eventually scrap the compressor.
This is really unfortunate because the new compressor is very expensive to install. A good quality compressor will set you back from $250 to $500. This isn’t even taking into account the labor which also is going to cost you a few hundred dollars. Plus, the charging of the system will set you back some more. Things can get really expensive pretty fast.
That’s why if you charged your system manually, you may be thinking that your system is overcharged. You need to act fast to prevent possible damage to the AC lines and the compressor that is making all this cooling possible.
Because even these things are pretty simple, they can be extremely damaging to the AC system and cause malfunctions and a lot of money spent on repairs.
Overcharged AC, Symptoms #6: Overheating Issues
If the compressor and engine work at a big load, you can also expect your engine to show some overheating issues. This will be most notable when you are pushing your car as well as the air conditioning is running.
This overheating may not be something significant. But it is enough to tell you that you need to perform a repair on time and purge the overcharged AC system to return the engine and AC compressor to normal function.
Overcharged AC Causes
Understanding why an air conditioning (AC) system in a car becomes overcharged is crucial in both diagnosing and preventing the issue. This section will cover various factors that contribute to an overcharged AC unit.
Overcharged AC, Causes #1: Incorrect Refrigerant Charge During Installation or Repair
One of the leading causes of an overcharged AC system stems from errors made during its installation or repair. The task of filling an AC unit with refrigerant requires precise calibration. If an automotive technician inadvertently introduces an excess amount of refrigerant during these procedures, it results in an overcharged system.
This situation is more common with inexperienced or untrained personnel who might not adhere strictly to the manufacturer’s guidelines for refrigerant levels.
Overcharged AC, Causes #2: Overcompensation for Refrigerant Leaks
AC systems can develop leaks over time, which result in lower refrigerant levels. In an attempt to correct this, some technicians might add too much refrigerant back into the system. While this action is meant to compensate for the loss caused by the leak, it often leads to overcharging if not done carefully.
Regular checks and proper maintenance can help identify leaks early on, preventing the need for overcompensation and the risk of overcharging the AC system.
Overcharged AC, Causes #3: Faulty AC Components
Faulty components within the AC system can also lead to overcharging. For instance, the expansion valve, which regulates the flow of refrigerant, can malfunction and cause an overcharge if it allows too much refrigerant to flow into the system.
Similarly, a defective pressure switch might not adequately control the compressor, leading to an excess refrigerant charge. Regular inspections can help identify and replace malfunctioning parts promptly, preventing issues of overcharging.
Overcharged AC, Causes #4: Inaccurate Pressure Readings
Maintenance and repair work on AC systems require accurate pressure readings. A faulty gauge or an error in reading the pressure can mislead a technician into believing that the system needs more refrigerant, leading to overcharging.
Using reliable, well-calibrated tools and ensuring technicians are trained to interpret these readings accurately can help avoid such scenarios.
Overcharged AC, Causes #5: Use of Incorrect Refrigerant Type
The type of refrigerant used plays a significant role in the functioning of an AC system. Using an incorrect refrigerant can cause the system to behave as though it’s overcharged.
Different refrigerant types have varying operating pressures, and using one not specified for the particular system can result in pressure abnormalities, misleading technicians into thinking the system is low on refrigerant. Adhering to the manufacturer’s specifications for refrigerant type is key to preventing this cause of overcharging.
Overcharged AC, Causes #6: Neglecting Regular Maintenance
AC systems, like other components of a car, require regular maintenance for optimal performance. Neglecting this can lead to an accumulation of issues, such as leaks or faulty components, which can ultimately lead to an overcharged system.
By maintaining a regular service schedule, car owners can keep their AC systems running smoothly and avoid overcharging scenarios. By understanding these potential causes of an overcharged AC unit, car owners and technicians can better prevent this issue, ensuring the longevity and optimal performance of the system.
Avoiding overcharging not only enhances comfort during rides but also contributes to the overall health of the vehicle.
Overcharged AC System Gauge Readings
| High Side / Low Side PSI | Possible Interpretation |
|---|---|
| 250 PSI / 30 PSI | Air may have entered the AC system. |
| 250 PSI / 50 PSI | The AC system may be overfilled and the condenser isn’t effectively cooling. A blockage in the condenser is a possibility. |
| 225 PSI / 80 PSI | The expansion valve might be excessively open (unless your AC system uses an orifice tube). Excessive refrigerant could also be present. |
| 200 PSI / 70 PSI | A blockage is likely somewhere in your system, possibly prior to or at the expansion device. |
| 160 PSI / 10 PSI | The evaporator may be frosted, low-pressure tubing could be defective, or the expansion valve might be clogged. Check the evaporator, tubing, and expansion valve. |
| 150 PSI / 30 PSI | The presence of water in the AC system is indicated. |
| 150 PSI / >10 PSI | The expansion valve could be jammed open, or a leak might be present somewhere within your system. |
| 125 PSI / 30 PSI | The AC system might be undercharged or there could be an overabundance of oil in the compressor. |
| 100 PSI / 100 PSI | The AC compressor isn’t activating, possibly due to a lack of power or a burnt coil. |
| 50 PSI / 50 PSI | The clutch isn’t engaging, preventing the system from working properly. |
Note: A well-functioning AC system generally demonstrates 150 PSI on the high side and 30 PSI on the low side.
How To Evacuate Car AC System
When checking your AC system’s pressure, always remember to use appropriate safety gear, including gloves and safety glasses, and follow your vehicle manufacturer’s guidelines. If in doubt, consult a qualified mechanic. Don’t drive your car if the AC system is heavily overcharged, as this can lead to severe system damage and potential safety hazards.
Purging an AC system at home is not recommended and it’s considered a dangerous practice. Without the proper equipment, you should not even try to do it.
In most cases, you are going to hurt yourself and carry some permanent consequences on yourself in the future. These gasses that are used are dangerous chemicals and cannot be handled as easily as you think.
You can release these chemicals into the atmosphere. On top of that, they have to be properly handled and stored. That’s why purging your AC system by yourself is not recommended practice to do. Regardless, here’s a look at the general step-by-step process, not so you could do it yourself, but just to know what your mechanic has to do…
Overcharged AC, Evacuating The AC Unit, Step 1: Gather Your Tools and Safety Gear
Before beginning any maintenance on your car’s AC system, make sure to gather all the necessary tools and safety gear. A professional technician would typically use the following:
- AC Manifold Gauges
- Automotive AC Refrigerant
- Safety glasses
- Gloves
- Long-sleeved clothing
Don’t forget to protect your eyes, hands, and skin to avoid potential injuries.
Overcharged AC, Evacuating The AC Unit, Step 2: Cool Down the Vehicle and Prepare the Work Area
Turn off your car’s engine and allow it to cool down before beginning any work. Engage the hand or parking brake for added safety. It’s important to work in a well-ventilated area to avoid the buildup of potentially harmful gases.
Overcharged AC, Evacuating The AC Unit, Step 3: Attach the Manifold Gauges
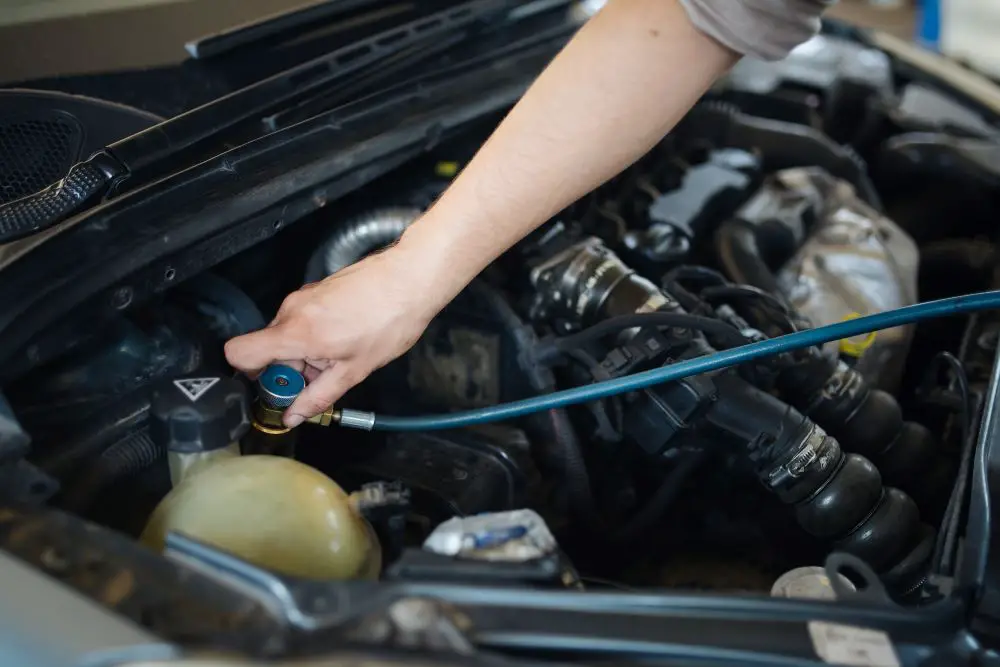
Once the engine has cooled down, open the hood and locate the AC’s low-pressure port. This port is typically covered by a plastic cap and is connected to the larger of the two AC lines. Attach one of the hoses from your AC manifold gauge set to this port.
Overcharged AC, Evacuating The AC Unit, Step 4: Attach the Refrigerant
Next, attach the other end of the hose to your automotive AC refrigerant container. This process will prepare the system for evacuation, but remember, do not open the valve just yet.
Overcharged AC, Evacuating The AC Unit, Step 5: Start the Engine and AC System
Start your vehicle and engage the AC system. The AC should be set to its coldest setting and the blower to its highest setting. This action should cause the needle on your manifold gauge to rise into the red zone, indicating an overcharge.
Overcharged AC, Evacuating The AC Unit, Step 6: Evacuate the Refrigerant
Carefully open the valve on the manifold gauge. Monitor the gauge closely; the needle should gradually move from the red zone toward the yellow zone as the refrigerant is evacuated.
Overcharged AC, Evacuating The AC Unit, Step 7: Stop the Evacuation
Once the needle reaches the green zone, stop the evacuation. This indicates that the amount of refrigerant in the system is within acceptable limits.
Overcharged AC, Evacuating The AC Unit, Step 8: Switch Off the Vehicle and AC System
After you’re done, turn off the vehicle and AC system. It’s important to shut down the system to prevent the compressor from sucking in any air that may have entered during the evacuation process.
Overcharged AC, Evacuating The AC Unit, Step 9: Disconnect the Manifold Gauges and Refrigerant
Next, disconnect the hose from the low-pressure port and replace the plastic cap. Also, disconnect the refrigerant container from the other end of the hose. Remember to handle these tools carefully to avoid any accidental discharge of refrigerant.
Overcharged AC, Evacuating The AC Unit, Step 10: Test the AC System
Finally, restart your car and turn on the AC system to test it. If the AC is functioning properly and blowing cold air, you’ve successfully evacuated the overcharged refrigerant.
Please note, this is a complex process involving the handling of potentially hazardous materials and should not be attempted at home. Always consult with a professional technician for AC servicing. This step-by-step guide is simply to educate you on what the process entails.
Recharge Car AC
In order to ensure your car’s comfort levels and keep it as a cool haven during the hot months, it is essential to maintain an optimally functioning air conditioning (AC) system. One of the crucial maintenance tasks is to recharge your car AC when required.
But how do you know when it’s time? An AC unit that needs recharging often fails to cool the air effectively. Additionally, a stale smell may emanate from the vents. These are key signals that it’s time to recharge the car’s AC.
The good news is that you can handle this task yourself using a mass-market AC recharge kit. Our choice for this tutorial is the popular A/C Pro kit. This kit contains everything you’ll need to safely and efficiently recharge your car’s AC system.
Step 1: Safety First!
Before you start, remember to wear safety glasses and gloves to protect yourself. Dealing with pressurized systems can be risky if not done with caution. Also, ensure your car’s engine is cool to avoid burns.
Step 2: Checking Ambient Temperature
To begin the recharging process, first, ensure the outside temperature is above 55°F. This is crucial as refrigerant functions effectively within certain temperature ranges. If it’s too cold, charging might not be effective and could potentially harm your AC system.
Step 3: Engine On, AC at Maximum
Start your car’s engine and set the AC to its maximum setting. This is a preliminary step to start the recharging process. Keep an eye on the AC compressor to make sure it’s working correctly during the process.
Step 4: Locate the Low-Side Service Port
The A/C Pro kit is designed to be attached to the low-side service port. This port can generally be found on the line connecting the compressor to the accumulator. Please consult your car’s manual to locate it precisely.
Step 5: Cleaning and Preparation
Before attaching anything, clean the port area with a rag to avoid introducing any contaminants into the AC system. Once cleaned, remove the cap from the low-side service port.
Step 6: Connecting the A/C Pro Kit
Attach the charging hose from the A/C Pro kit to the low-side service port. Make sure the connection is secure. This step ensures the refrigerant is safely channeled into your AC system.
Step 7: Begin Recharging the System
Following the instructions included with the A/C Pro kit, start adding the refrigerant into the system. Monitor the gauge provided in the kit throughout the process, ensuring it stays within the recommended pressure range.
Step 8: Watch Your AC Compressor
Your AC compressor clutch should engage as the refrigerant is added. You’ll know this is happening when the compressor’s pulley is rotating. If it doesn’t engage, consult a professional as this could indicate a more serious problem.
Step 9: Finish and Disconnect
Once your gauge shows that the system is charged to the recommended pressure, stop. Overcharging can be detrimental to your AC system. After confirming the pressure, disconnect the A/C Pro kit hose from the low-side service port.
Step 10: Final Checks
Before replacing the service port cap, inspect the seal for any damages. If it’s in good condition, replace the cap. Start your car and let the recharged AC system do its job. You should feel cooler air immediately.
Step 11: Monitoring and Leak Detection
Following the recharge, it’s worth checking the system after a couple of weeks. If the AC performance has diminished again, you may have a leak. If this is the case, consult a professional for further advice or repair.
By following these steps, you can recharge your car AC effectively and keep your vehicle comfortable, particularly during the warmer months. However, remember, if you’re unsure at any point, don’t hesitate to contact a professional. Safety and proper care of your vehicle should always be the top priorities.
How Much To Fix AC In Car
This is the recommended solution to do to solve your problem with overcharged AC. By doing this you will pay more, but the result will be a perfectly working AC.
Even if you manage to purge your system at home you will not be able to find out the right refrigerant values that you have in your system.
That’s why visiting a shop that is familiar with this kind of stuff knows what to do and they will fix your problem in like 15 minutes. Then you are good to go.
You will pay somewhere between $150 and $250. If you are lucky and you find a shop that is doing this work for cheaper, it’s going to be amazing as well.
The mechanic will connect the machine to your car and will tell you how much refrigerant you have and it will release some of it until the volumes are ok.
Car AC Compressor Replacement
Overcharging your car’s air conditioning (AC) unit is not just a minor issue—it’s a serious problem that can cause significant damage to your vehicle’s AC system, especially to the AC compressor.
When an AC system is overcharged, it means there is too much refrigerant in the system. This excess refrigerant can create high pressure, leading to an overworked AC compressor. Consequently, the compressor might fail prematurely due to the increased load and heat.
This guide will walk you through the process of replacing the AC compressor, should you encounter such a problem. It’s worth noting, however, that some of these steps can be quite technical. So, if you’re not comfortable performing them yourself, it’s always a good idea to seek professional assistance.
While an overcharged AC system can lead to serious issues like compressor failure, understanding the replacement process can empower you to tackle the problem head-on. Whether you choose to undertake the task yourself or hire a professional, this knowledge is crucial in ensuring that your car’s AC system continues to function optimally.
Phase 1: Finding the AC Compressor
Your car’s AC compressor is typically located at the front of the engine, alongside other belt-driven accessories. To locate it, here are the steps:
1: Pop the hood of your car and visually inspect the front of the engine. You should be able to spot the AC compressor easily.
Before proceeding with the compressor replacement, it’s crucial to handle the refrigerant in the system appropriately:
2: Engage a certified professional to recover the refrigerant. They will use an evacuation machine to safely remove the refrigerant from the system. This step is crucial as mishandling refrigerant can harm both you and the environment.
Phase 2: Removing the Old AC Compressor
Once the refrigerant has been safely evacuated, you can proceed to remove the compressor with these steps:
3: Locate the serpentine belt tensioner. It can usually be found on the front of the engine, and a belt routing diagram can help you locate it if needed.
4: Use the appropriate tool (like a socket or wrench) to move the tensioner away from the belt, releasing the tension.
5: Remove the belt from the pulleys while keeping the tensioner in place.
6: Disconnect the electrical connections from the AC compressor.
7: Using a wrench or ratchet, carefully disconnect the pressure hoses from the AC compressor.
8: Remove the mounting bolts holding the compressor in place.
9: Gently remove the old compressor.
Phase 3: Installing the New AC Compressor
Now that the old compressor is out, it’s time to install the new one with these steps:
10: Compare the new compressor with the old one to confirm they match.
11: Apply a small amount of the recommended lubricant to the new compressor.
12: Replace the old o-rings on the A/C pressure lines with new ones.
13: Lower the new compressor into its spot and align it with the mounting holes.
14: Secure the new compressor by reinstalling and tightening the mounting bolts.
15: Reconnect the pressure hoses to the compressor.
16: Reinstall the electrical connectors as they originally were.
17: Reinstall the belt on the pulleys, using the belt routing diagram as a guide.
18: Adjust the tensioner to secure the belt onto the pulleys.
Finally, have a certified professional recharge the AC system with the appropriate amount of refrigerant.
Can I Drive With Overcharged AC
Driving like this is not recommended. If you are using the AC, you are risking some permanent damage to the compressor as well as to the AC lines. This damage can cost more to repair than the actual value of the car if you are running an older vehicle.
That’s why when you are charging your system is recommended to visit a shop to do this work on your vehicle. If you are doing this at home with those unreliable gauges you are risking overfilling the AC system and causing it not to work properly as it should.
If you are not using the AC, you will be ok driving like this because the compressor is not spinning so you don’t have to worry about anything.
Facts: Symptoms and Risks of Overcharged Car AC
- Overcharging car AC can cause poor cooling, no air coming out of the vents, weird engine bay noises, and the check engine light turning on.
- DIY refills with cans of air conditioning freon are a common cause of AC overcharge issues, as pressure gauges may be non-existent or inaccurate.
- Symptoms of overcharged AC include weak cooling, no airflow, and unusual noises coming from the engine bay.
- Bleeding off an overcharged AC is a job for a professional AC mechanic with specialized tools.
- Fixing an overcharged AC can cost $100 to $250, and compressor failure can cause thousands of dollars of damage.
- Overcharging car AC can lead to compressor damage, which in turn can cause the serpentine belt to snap, resulting in engine overheating (like when your car overheat when AC is on).
- Overcharged AC generally doesn’t cause engine overheating but can cause overheating in the passenger cabin.
- The more you use the AC, the sooner it will need a recharge, and it can operate on a single charge for 2-3 years in moderate climates.
- Recharging car AC annually is necessary in hotter areas where AC is needed for most of the year.
- Overfilling AC with freon can reduce its effectiveness and lead to compressor damage, while a lack of coolant can cause AC to blow hot air.
Overcharged AC: In Conclusion…
In this article, we have learned a lot when it comes to AC systems and overcharged AC. We learned how this system is working in practice and all of the components from which it is constructed.
Then, we focused on the symptoms connected to overcharged AC and these were the overload of the compressor, the low cooling ability, and the low engine power.
Moreover, we shared our opinion if you should purge the AC by yourself or you should let this work to a mechanic. As a whole, we recommend a visit to the local mechanic to get this done quickly and efficiently without putting your health at risk.
FAQs On Overcharged AC
If you’re still curious to learn more about overcharged AC, our FAQs here might help…
How Much Does It Cost To Fix AC In Car
The cost to fix a car’s AC system will be highly dependent on the root cause of the problem. And, which is the particular AC-related component that’s caused that issue to appear? An overcharged AC, for example, will require a technician to not only evacuate/purge the AC system of excess refrigerant. But on top of that, they’ll need to top up the Freon, as well. A job like this would cost you around $150 to $250. Meanwhile, if serious parts of the AC system have failed, such as the compressor, then you’ll need to shell out about $250 to $500 for a replacement. On the other hand, replacing simple O-rings, seals, and gaskets would be relatively cheap, as little as $100.
How To Use AC Pro
AC Pro is a great air conditioning Freon (refrigerant) recharge kit, where you too can top up with some Freon in under 15 minutes. And, it’s pretty easy to use, too! First, a quick peek under the hood will tell you where the AC compressor is located. Once you’ve found it, trace the tubes and hoses that lead from the compressor. You should find two ports with colored caps on them – one for the HIGH side, and the other for the LOW side. You can then plug the AC Pro kit into the LOW side port of the compressor. Look at that AC Pro can’s gauge, and turn the dial to correspond to the outside temperature. Now, squeeze the trigger until the pressure gauge reads within the V.
How Much To Recharge Car AC
If your car’s AC isn’t blowing out cold air anymore, then maybe it’s time to recharge the refrigerant (Freon). To do this, it’s best that you head over and visit a qualified technician to do it. Granted, you could handily buy AC recharge kits for as little as $40 to $60. However, owing to the toxic nature of Freon gas if it leaks. And, the sheer amount of damage that can be done to the AC system if you’ve messed it up… It’s likely better to have a professional do it, instead. If so, a typical workshop might charge somewhere between $150 to $300 to recharge your car’s AC with fresh refrigerant, on average.
What Causes Low Side AC Pressure Too High
Should your car’s AC not blow out cold air anymore due to the low-side AC pressure being too high, there could be numerous reasons for this. For the most part, this is caused by a faulty condenser fan, or if there’s debris blocking the fan itself. Otherwise, you might be dealing with Freon leaks, usually coming from the evaporator coils. If so, it can indicate more serious faults in the AC system. If not, another possible cause of the low-side AC pressure being too high is an overcharged AC system. When you add way too much Freon/refrigerant into the AC unit, it will cause pressures to skyrocket, even when the engine’s turned off.
How Much Freon Does A Car Hold
The amount of Freon (aka refrigerant) that a typical car’s AC unit can hold will vary from one car to the next. In total, most cars should be able to hold somewhere around 28 to 32 ounces of Freon. This equates to about 2 to 3 12oz cans of Freon if you’re curious to recharge the refrigerant yourself. Although, some vehicles might be able to hold more Freon than that. Usually, luxury cars with advanced or beefy AC units will often carry more refrigerant. If you need to find a more precise quote, the owner’s or repair manual should contain data on the exact amount of Freon that your particular car’s AC can hold.
How to Bleed off an Overcharged Car AC
Bleeding off an overcharged car AC requires careful handling and professional knowledge. You may need to use an AC recharge kit that features a pressure gauge. Connect the kit to the AC service port and carefully monitor the pressure. If it’s too high, you might have to slowly release the refrigerant into an approved container. However, it’s essential to note that handling refrigerant can be dangerous, and it’s illegal to vent it into the atmosphere. Therefore, it’s usually recommended to consult a professional technician.
How to Fix AC in Car
Fixing an AC unit in a car can involve several different processes depending on the issue. For basic troubleshooting, you may need to check the AC’s refrigerant level, fuses, and compressor. In case of more complicated issues like leaks or electrical problems, it’s advised to contact a professional mechanic. They have the required expertise and tools to safely and efficiently repair car AC systems.
How to Put Freon in AC Unit
To add Freon to a car’s AC unit, you’ll need an AC recharge kit which includes a can of Freon and a pressure gauge. Locate the AC service port, connect the recharge kit, and monitor the pressure while adding the refrigerant. It’s important to avoid overcharging the system, as it can cause other issues. Ensure you follow the manufacturer’s recommendations regarding the correct amount of Freon.
How to Check Refrigerant Level in AC
Checking the refrigerant level in a car’s AC involves the use of a manifold gauge set. After ensuring the AC is off, connect the set to the AC system’s service ports. Turn the AC on and observe the readings. If they’re within the recommended pressure range, the refrigerant level is adequate. However, low pressure may indicate a low refrigerant level, while high pressure could signal an overcharged system.
How to Remove Excess Freon from Car AC
Removing excess Freon from a car’s AC should be done with great caution. It involves using a refrigerant reclaimer to safely extract the refrigerant without releasing it into the atmosphere. This process can be complex and requires professional knowledge to avoid damage or harm, thus it’s typically recommended to enlist the services of a professional AC technician.
Can Freon Kill You
Freon is a refrigerant that’s hazardous when improperly handled. Direct contact can cause frostbite and inhalation can cause asphyxiation, lung irritation, and even serious heart issues. It’s important to handle Freon with care, wear protective gear, and ensure proper ventilation.
How to Release Freon from Car
Releasing Freon from a car’s AC is not a DIY job due to environmental and safety concerns. Freon can cause harm if improperly released. The EPA mandates that refrigerants be captured with a recovery machine to avoid harm to the environment and personal injury. It’s recommended to let a professional mechanic handle the task.
What to Do if AC Pressure Is Too High
High pressure in the AC system typically indicates an overcharged system or blockage in the system. In such cases, it’s advisable to take the vehicle to a professional mechanic. They can properly diagnose and fix the problem, preventing potential damage to the AC system and ensuring it works efficiently.
How Long Does It Take to Fix AC in Car
The duration it takes to fix a car’s AC largely depends on the nature and extent of the problem. For simple issues like recharging the refrigerant, it can take about an hour or two. However, more complex problems like fixing a leak or replacing the compressor can take several hours or even a few days if parts need to be ordered.
Can I Recharge My Car AC Myself
Yes, you can recharge your car’s AC yourself, but it requires care and some basic knowledge. An AC recharge kit is needed for this process. This kit includes a canister of refrigerant and a pressure gauge. While it’s a relatively straightforward process, it’s crucial to avoid overcharging the system, which can lead to other issues. Always consult your vehicle’s manual for specifications and follow instructions carefully.