
Interested in car photography? Whether you are just starting out, or a professional, follow this article to learn about all things automotive photography-related. The main topics covered are:
10 Tips For Car Photography From A Professional
Car photography can be challenging at times, there are many factors that can make or break a fantastic shot. However, there are many simple tips and tricks that professional automotive photographers can use to help make the process easier. This can be as subtle as knowing how to place a car or as complex as travelling to different countries to retrieve a specific background. Follow these 10 tips below to help you capture the perfect image:
1) Get The Best Light
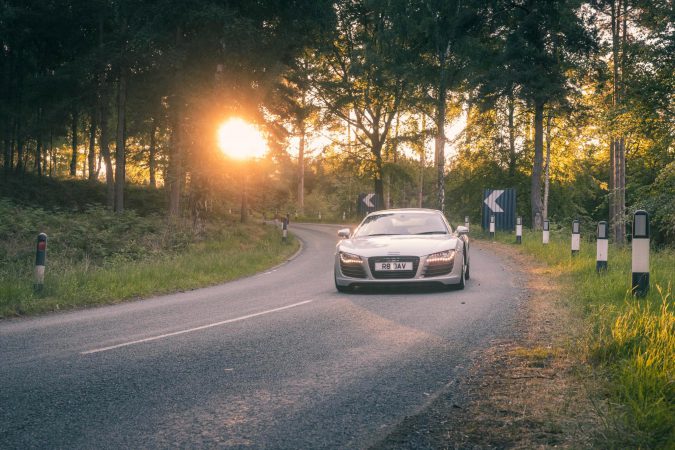
Landscape Photographers advise that shooting at the right time of day, like sunrise and sunset, can significantly elevate the quality of your pictures and make them look more appealing.
In photography terms, we refer to this as ‘the golden hour’ or the time that the Sun is low in the sky and is in fact a popular approach in automotive photography. The brilliant reds, purples and pinks increases the visual presentation.
The obvious downside to this can be that shooting at sunrise, in particular in the summer, can be a challenge. Setting an alarm for 3 am is no fun, we’ve been there. However, setting off before anybody else is awake, lining up your car just right and then watching an amazing sunrise light up the sky while you shoot away – there’s nothing like it!
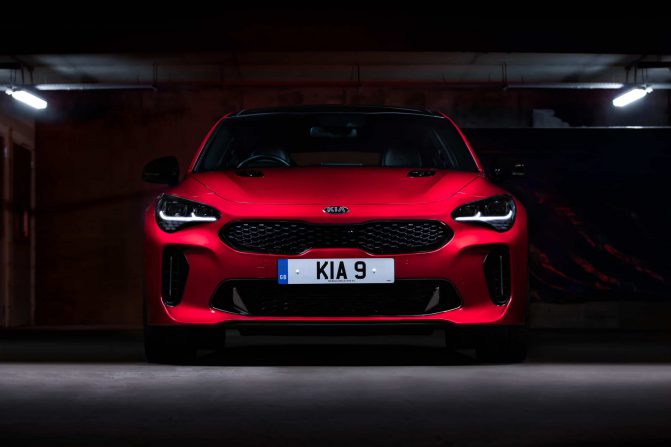
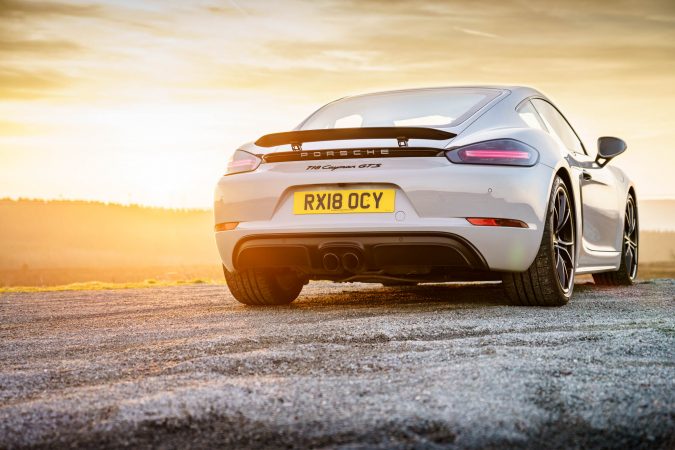
2) Avoid Eye Level
Pictures can often look boring because they are taken the same way – from eye-level! Moving away from the standard eye-level shot can be incredibly rewarding.
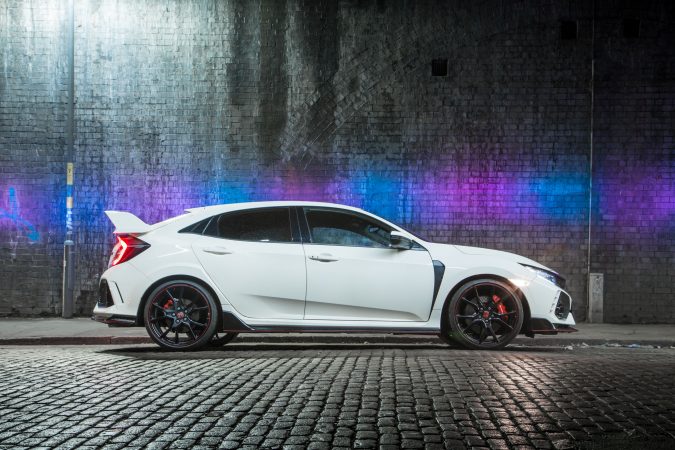
Automotive photographers can go to great lengths just to try to change the viewing angle of cars. This can be lying face-down in the dirt to reach a difficult low angle or climbing up the side of buildings to get a top-down shot.
Moreover, even a simple elevation change of a foot or two can make a huge amount of difference. Next time you’re photographing a car, simply try kneeling down to see how the shot changes and from a lower angle, it’s easy to make a vehicle look a lot more aggressive! Maybe try shooting at licence plate height and take it from there.
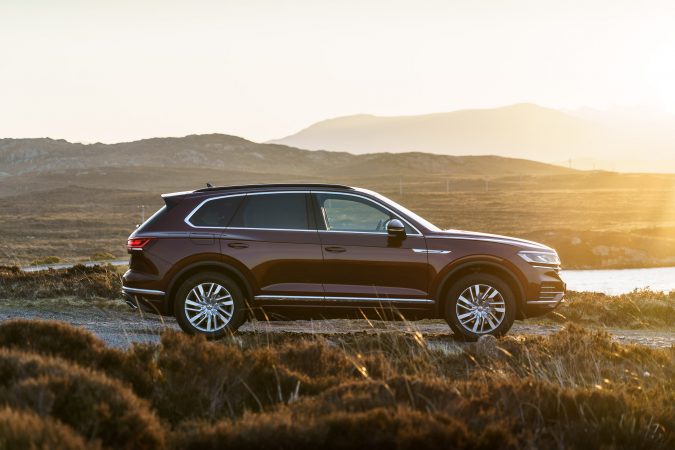
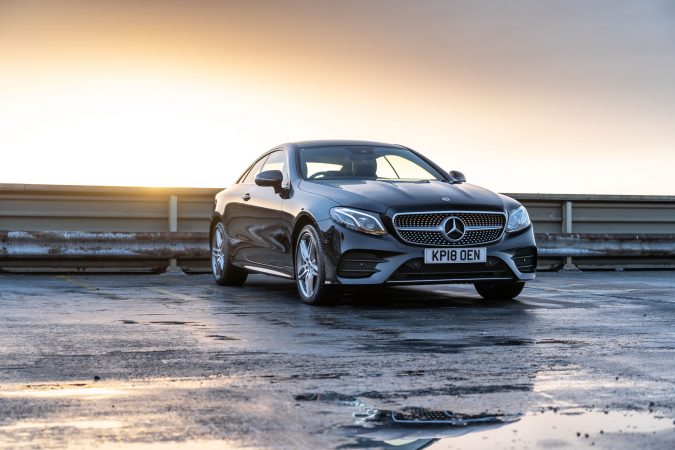
3) Location, Location, Location…
Another often overlooked aspect of the photo is the location. Automotive photographers quite literally, go to great lengths to put the car in the perfect place. However, location is much more than just ‘a nice view’ – it should help tell you more about the vehicle.
For instance, a beautiful model on a wide open road in an amazing landscape can make you wish you were at the wheel, in that location and experiencing all the joys of driving. Whereas, a car shot in a moody, urban environment can be more of a ‘lifestyle’ image, showing how cool it would be to cruise around at night!
Finally, there is always Photoshop. For those on more limited budgets (and that includes the car manufacturers themselves) it is very common to use composite car imagery. This means that the background is a completely separate picture and the car could have been shot in a studio – that’s the wonders of modern technology for you!
4) Put The Background First
Very similar to the previous point about location, the background tells half the story! Once you’ve chosen your amazing spot, you should try to pick the perfect backdrop.
As you begin to put the previous points into practice, e.g. not shooting at eye level and getting the best lighting, then the background to the image becomes increasingly important.
Do you have trees or lamp posts blocking the shot, for instance? Do you want to show the winding road behind the car to illustrate the feel of driving? How is the light interacting with the background?
It can be very easy to focus all your attention on the vehicle itself, but you need to pay just as much attention to the background to complete the image. This means getting rid of distractions and perfecting the detailing to add to your enjoyment of the image.
5) It’s All About The Angles
The placement of the car in order to get the best shot can be one of the most challenging aspects of automotive photography. Vehicle manufacturers spend millions of pounds perfecting the shape and lines of their product so why, as photographers, should we simply ignore it?
When we first shoot a model, we like to spend 5-10 minutes just walking around it, looking at it from high points and low points, close to the car, further away… just to get a feel for the shape and how the light changes as you move around the car.

Most models have a very prominent ‘hip line’ that runs from just above the front wheel, across the doors and down over the rear third. The more sporty the car, the more exaggerated these lines can be. However, shooting slightly higher, lower or simply changing the angle that you view the car from, can have a marked difference on whether you make it look ‘bulky’ or more sporty and aggressive!
6) Shoot Into The Sun
Shooting into the Sun is often overlooked as it causes lens flare and can make exposing a scene incredibly challenging. However, the rewards are worth the extra effort.
Shooting into direct sunlight will often leave the subject in silhouette, as you are looking at the dark side of the vehicle. This requires a bit of technical knowledge and patience! Most modern cameras have great dynamic range (how much of the light and dark areas of a scene it can record) but we still recommend ‘bracketing’ (taking multiple exposures of the same scene, some lighter, some darker) so that you gather as much data as possible. This can then be merged together in Lightroom later.
Technical jargon aside, the resulting images can be really eye-catching and it’s another commonly used style that you will see cropping up in automotive photography on a regular basis.
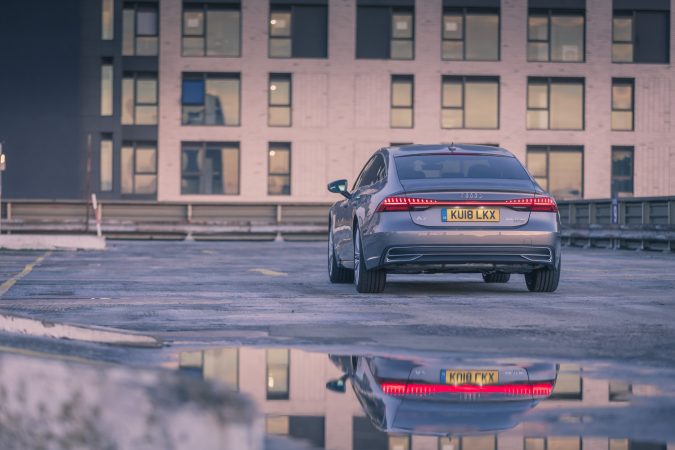
7) Check Your Frame (And Reflections!)
A distracting signpost or a weird ‘growth’ popping out of the top of your car can instantly ruin the ‘perfect’ shot you think you took.
Even worse is that in the heat of a shoot, you probably won’t even spot them at first. This will cause unnecessary time wasted at home when you are photo shopping the blemishes out.
A technique I like to call ‘photo shopping with my feet’ means I move litter and leaves from around the scene with my own feet to prevent cutting them out of my copies later on.
This is equally true of reflections – in particular, when you are close to the car shooting specific details. Nobody wants to see my face in the bonnet of a sportscar, so make sure you change the angle slightly to avoid your own reflection getting in the way of the shot!
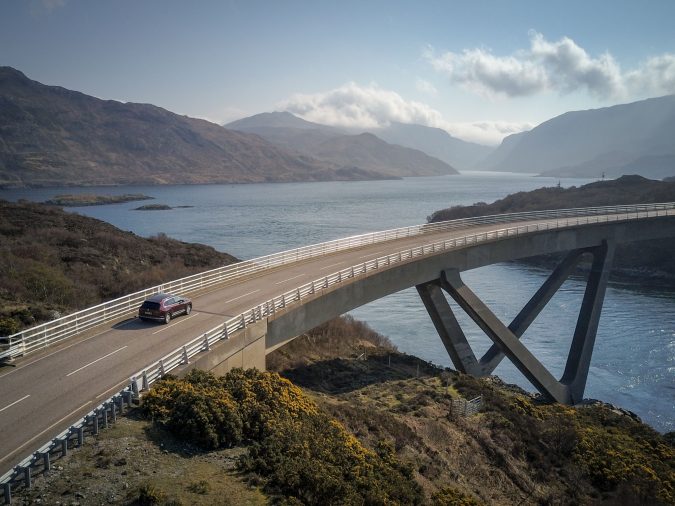
8) Get Moving… (Car-to-car Shots)
We have a big belief that cars look better in natural environments doing what they are built to do! Move… So getting the all-important action shots can be critical to a good shoot. This is where ‘car to car’ shots come in. As the name suggests, this involves using a ‘chase car’ to shoot from so that you capture the show car rolling down the road.
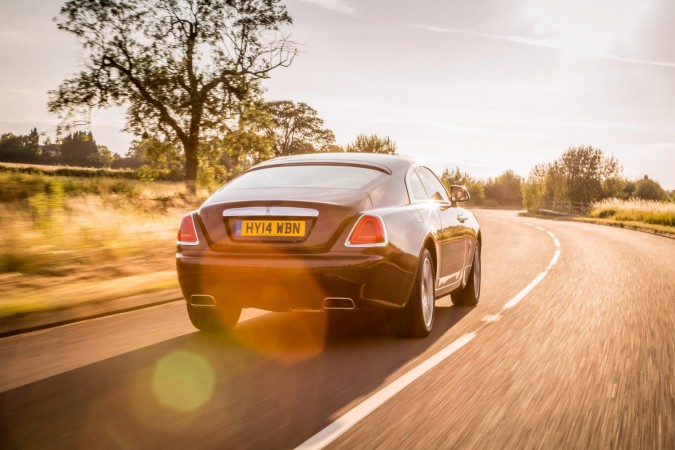
These can be very challenging shots. From a technical perspective, the cameras usually need to be on a solid surface, not bolting down the road at 50mph. In order to get the most dramatic shots, you need to be at a slower shutter speed (1/80 th of a second is a good starting point) meaning that if the camera is unstable, it is difficult to get a sharp image. Your expertise will improve with experience in trial and error.
In addition, safety is paramount. Making sure that your expensive camera equipment is strapped to you (and you are strapped to the chase car) is very important. However, practice makes perfect and starting at slower speeds on safe roads is a must.
9) Shoot At Night (Light Painting)
Although sunrise and sunset are great times of day for a shoot, shooting at night means that the vehicle can take on a whole different look. As cars are very reflective, shooting them at night against a city skyline can really help a vehicle become at one with its environment.
Shooting at night obviously has its own drawbacks and more often than not, you’ll need to add some form of artificial light (light painting) to make the car stand out and then they can make for some really special images.
I’m probably not alone in saying that cars look their best at night. I always prefer the slightly darker, moodier images. When you throw in the headlights or the spill of red from the brake light, there’s just something special about a model shot at night.
10) Don’t Worry About The Gear
One of the main things that photographers get hung up on is having the right gear and with photography, right usually means more expensive! There is no doubt that better gear can yield better results – a £30k camera should out shoot a phone camera and rightly so.
However, you’d be amazed at what you can get from camera phones and cheaper DSLRs with the gap between the cheap and the expensive getting smaller by the day. Commonly, the only reason that more expensive cameras are used on commercial shoots is the resolution – to make cleaner images that can be printed larger.
A better way to invest your money (in particular when starting out) is on experience. Attend car shows, events, arrange meets with private owners and do what you can to keep shooting. You will know when you’ve outgrown your camera but learning how to shoot properly because you’re shooting daily is far more important than owning a big expensive camera.
I hope these points give you some insight into how professional automotive photographers manage to capture those beautiful gallery-worthy shots. More importantly, I hope you can see how a few subtle changes whilst shooting cars can give you a head start in getting those killer shots yourself!
How To Edit Automotive Photography In Lightroom
This is not a short topic to cover. Editing automotive photography can be done in countless different ways. However, if you are just starting out and are after some basic pointers on how to make your shots more interesting in the editing process, then here are some tips:
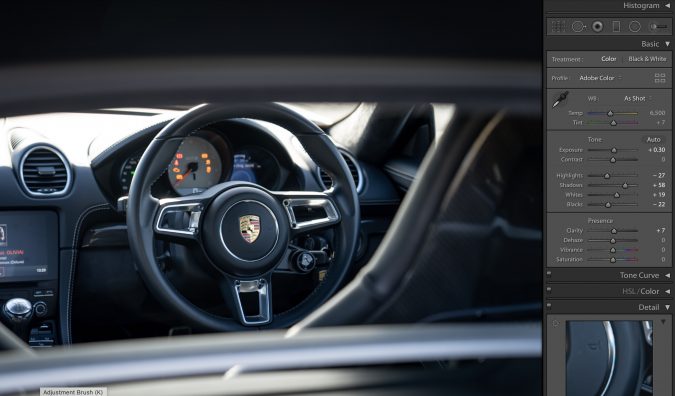
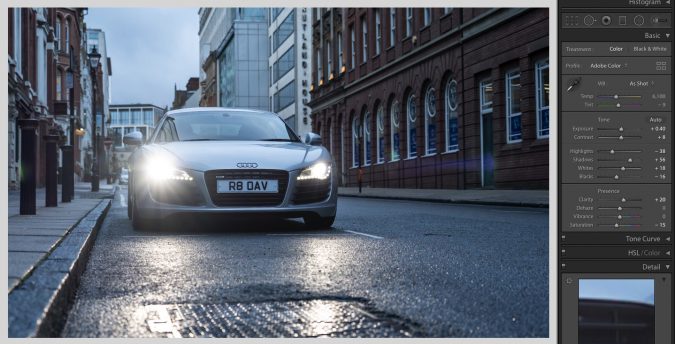
Basic Adjustments Panel
These are the commonplace adjustment settings in Lightrooms. By changing the below settings you can make key changes to your car photography.
Exposure – Take a look at the shot to make sure the image is correctly exposed, then make adjustments to correctly expose it. Look all around the shot and find the balance of exposure for the entire photography. This is a crucial step, as it doesn’t matter how good the rest of the shot is. If it is badly exposed, then people may not even look at it.
Contrast – This option is mainly down to taste, but use it sparingly. If you feel the need, then try raising the contrast slightly to make the car stand out but don’t go overboard as going over +10 could make the image look really washed out.
Highlights – Often, when shooting outdoors, the finest aspects of the car can be lost when panels are overexposed or reflecting bright light. Consider lowering the highlights to bring back the details in those areas of the image.
Shadows – Lots of detail can be missed in the shadows of the car, so try raising the shadows to unlock those extra aspects. The amount you can raise the shadows by will vary from image to image, but try not to go over +70, as you might be going too far.
White and Blacks – This will differ a lot from shot to shot, but play around. Try to bring the whites up and the blacks down a little, to see what works best for that image.
Clarity – Adjusting the clarity of the shot positively can make your image and car look a lot sharper. How far you go will depend on your taste and the equipment used. You can to try increase the clarity of the image but stay under +30 and then see how your image looks.
Vibrance & Saturation – Depending on the car and the backdrop, increasing or decreasing the vibrance and/or saturation globally of the image can make a big impact on the look. So, try either way to see what works best for your image.
Temperature & Tint – Adjusting the temperature or tint of the image can make a big difference to the appearance of the photograph. If you have shot a car near a field in daylight, you can adjust the temperature towards yellow to look a little warmer. If you have pictured a vehicle in a multi-storey car park at night, then you might want to adjust the temperature towards blue, which gives the scene a colder look. It is very effective in changing the feel of the image.
Tone Curve Panel
This is probably the most misunderstood section of Lightroom. The Tone Curve is a representation of all the tones in your image.
The bottom axis (the X-axis) of the table is the tone axis, starting with shadows on the left and highlights on the right and mid-tones in the middle. These are then further split into darker mid-tones, called darks and brighter mid-tones, called lights. If you hover over the curve with your mouse, then it will show you these labels.
The Y-axis is a representation of the lightness of each tone.
Making adjustments to the curve for automotive photography is the same as for any other genre. When adjusting the curve, moving the line upwards makes that element brighter and moving it down makes it darker.
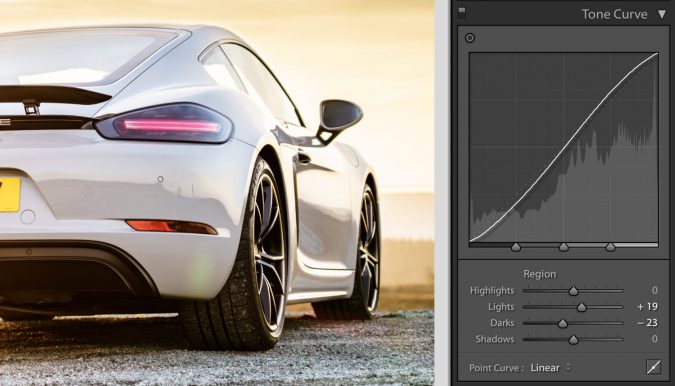
For car images, you can make some gentle adjustments to the curve and add some style to your shots. With experience, you will get better at using the tone curve, so try it from day one and build that experience.
HSL/Colour Panel
This adjustment panel gives you granular control of the colours of the three different element types: hue, saturation and luminance. In this panel, you can add significant style and flair to images by manipulating either one or multiple colour groups at a time.
The advice here will be unique to the landscape of your image. So, all we can advise is to play around, then adjust the colours to capture what you are looking for.
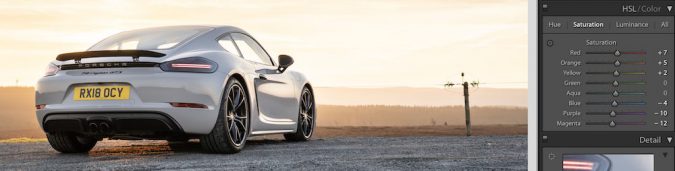
Here is a breakdown of what the three different element types are:
Hue – This slider adjusts the colour found in your images. Sliding it, either way replaces one colour with a bordering colour from the colour wheel. When shooting cars, it allows you to completely change the colour of the paintwork in an instant. This is both good and bad, depending on whether you meant to do that or not!
Saturation – The saturation sliders are straightforward. You just move the slider to the left to reduce the saturation of a certain colour in the image and to the right to increase the saturation of the colour. With automotive photography, you can help the colour stand out by slightly boosting the shade of the car you have pictured and by slightly reducing the colours of the backdrop. But the options are endless…
Luminance – This slider adjusts the brightness of each of the colours. Meaning, you can make one colour brighter and it will stand out more than the others in the image. When shooting cars, again you can use this to help make the paintwork dazzle by boosting the colour slightly, which will make the car catch your eye just a little bit more.
Detail Panel
Sharpening – In some scenarios, you may want to sharpen your images. The amount you can use this varies and depends on the equipment used, light availability and the style of shot you are going for. You can sharpen as much as you like using the amount slider to get a sharper shot, but stop if the image becomes distracting.
Reduce Noise – Take a look at the dark areas of your shot and check for blurring. You might be able to correct this by increasing the luminance on the noise reduction slider. However, going too far might make your image look too perfect. Note that there is a slider for both luminance and colour. We would advise you to use the luminance function on the bulk of the image, especially the dark parts and use the colour slider to help reduce distraction in the more colour-saturated parts of your automotive photography.
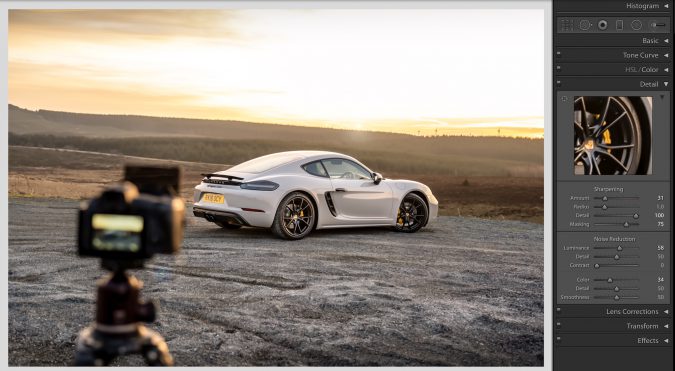
With both sharpening and noise reduction, you can change how much of the photograph the adjustment effects by using the detail slider per element. Take note of this and see how this affects your image.
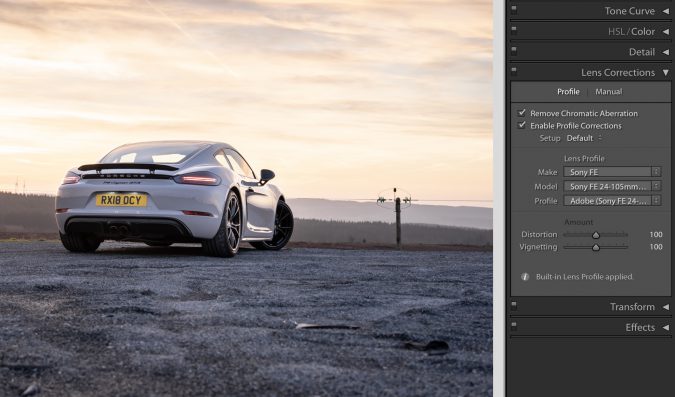
Lens Corrections Panel
Enable Profile Corrections – We would recommend enabling lens correction for your car photos in Lightroom, as it will help remove any distortion that was made from the lens that the image was shot with. Lightroom will auto-detect the make, model and profile of the lens. Make sure to check it the first time you use it.
Remove Chromatic Aberration – Chromatic Aberration, also known as colour fringing is when colours are incorrectly refracted by your lens. Lightroom has an option to correct this. You won’t need this for all your car shoots, but it is worth knowing it is there. Some automotive photographers choose to have it as a default option. We would advise you to just use it when you need to.
Transform Panel
Automatic Transform – When photographing vehicles in city landscapes, you will find that the car may be inconveniently placed next to signposts or buildings etc. These obstacles might be at different angles, depending on your lens and the angle shot at. The transform feature will help adjust your image to get those obstacles all lined up vertically and your image look uncluttered. This feature won’t work for all images, but give it a go. It can be a useful tool to have at your disposal.
![]()
It is worth noting for advanced users, that there are guided and manual adjustment options available, which can help with various automotive photography issues, such as horizons, buildings and road markings.
Effects Panel
Vignetting – When you are shooting outdoors most of the time , you might find that the edges of the image are more exposed than the rest of it, so you should consider adding some post-crop vignetting to blur the edges slightly.
Local Adjustments Panel
The local adjustments panel can make small changes to parts of the image without affecting the entire shot. In this way, we can isolate certain areas.

Graduated Filters – You might find that your car is correctly exposed, but the sky is not. This is often the case if you are not using a graduated filter on your camera. The good news is that you can use graduated filter in Lightroom to correct your image of the sky. Just scroll down from the top and use the exposure slider to drop the exposure at the top of the screen. This should help balance out the sky and the car in your picture.
Brush Tool – In some scenarios, your car might not have caught too much light but the rest of the scene might be nicely exposed. In this case, you can use the brush to apply this setting to adjust the parts that need it. You might find that you need to dial up the exposure and shadows just a little bit and keep painting over the areas that need it most to bring them up to scratch.
Clone Tool – When photographing cars, often they will be on the road and you will see litter, road markings, inconveniently-placed signposts or other cars creeping into your shot. The clone tool is ideal for cleaning up your images. We can’t stress enough the impact this has on creating a nice, clean car shot.
Cropping
How the image was shot is very important. Luckily, we can correct some of this by adjusting the crop. You might want to rotate the image slightly to make it level or to zoom in more. Sometimes by cropping, you can improve the look of the photograph, but don’t forget that cropping will reduce the over resolution of the final exported image.
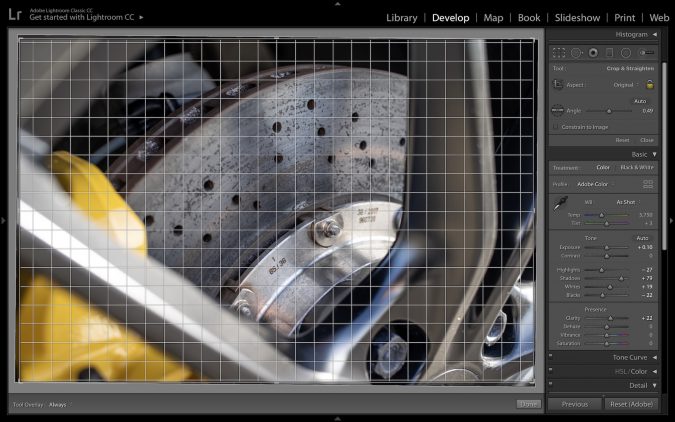
When looking at your crop, focus on how to make the car look as natural as possible, in relation to the road.
Shoot In Raw
Always make sure that you shoot your pictures in raw and not jpegs. This ensures that your camera has all the data it needs when capturing an image and allows you to get more out of the image when editing.
Basic Editing Summary
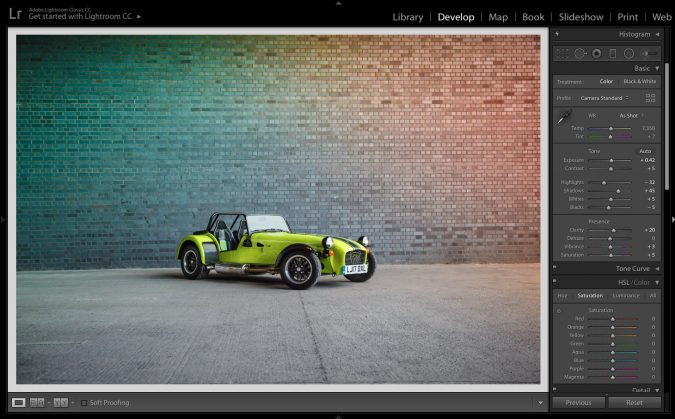
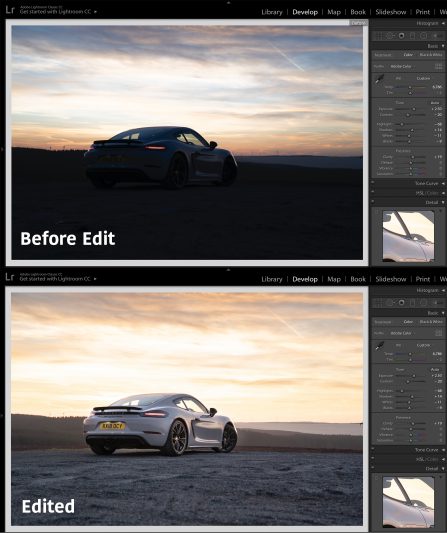
Using all of the above elements should enable you to make basic improvements to your car photography, such as in this example below:
There are many more features of car photography to take into account. We have just covered the basics so far…
Car Photography – FAQs
What Is Automotive Photography?
Automotive photography is the art of taking pictures of vehicles. This term covers a wide variety of vehicles, including: cars, trucks, vans etc. Self-declared automotive photographers will be regularly shooting vehicles and editing their work. Outside of shooting, they will probably be studying the topic and looking for new techniques and ways to improve their car photography.
How To Break Into Automotive Photography?
Getting started in any industry is difficult as a photographer and automotive is no different. Our advice for getting started would be to go out there and build a solid portfolio of work. Whether it is voluntary or paid work, it doesn’t matter. Spend as much time as you can on perfecting your art and create a portfolio to be proud of. Once you have that base portfolio and solid experience on the job, you can speak to potential clients and make them aware of your services and begin to get work.
What Do Large Automotive Manufacturers Pay For Photography?
The answer to this is that it always depends on the job. There will always be big and small jobs within the different categories also. This can be broken down into a few different scenarios:
Press Shots – This might be a job covering the brand’s press event for a few days or weeks at a time, taking pictures of the cars for use in editorial content. Some of the images will be generic for mass use and some would be bespoke for each publication. You could expect £500-£1,000 a day for this kind of work. The brand could be launching a completely new model, new trim or maybe even just a new drivetrain. This kind of press event is very common and operates throughout the year.
Major Advertising Campaign – As an example, if a premium brand is looking for a few super high-quality images for a large-scale advertising campaign you could expect £10,000+ for just a few images if your work is good enough. However, it could take you a lot of time getting that perfect shot and then also doing all the post-production.
Of course, there are endless ways to make money from automotive photography, you could shoot any car events, motorsport, car enthusiasts personal cars and work with local dealerships etc.
How To Advertise Automotive Photography?
If you are looking at showcasing your automotive photography there is a range of ways to do this. Let’s talk about some of them below.
Website – Build a website with a portfolio and use this as a central point to show off your work. Make sure you update it regularly. We would recommend having a selection of some of your best images, the services you offer, the location you wish to work in and your contact details.
LinkedIn – This would be a good place to share your work. Get to know some of the brands marketing and PR staff and make sure that they have seen the type of work you can offer. Here you can share your final products and some behind the scenes images. Talk about your images, how you built them and how you can help create high-quality work for your customers.
Facebook – Start to share your work on Facebook and allow others to follow your page. You might find that a little bit of paid advertising goes a long way on Facebook. You can target the exact type of person you wish to get in front of. You can do this by job title and even email address if you know what you are doing. It is worth understanding that as a business page Facebook is a paid place, meaning that to get reach you really need to pay for your followers to see your content and your audience to grow.
Instagram – Similar to Facebook it is a fantastic place to share your pictures, gain followers and to speak with people in the industry. Post regularly and be a part of the community, like and comment on other peoples images in a meaningful way as much as possible.
Blogging / Guest Posting – Reach out to large websites and look for opportunities to post about your work. This is a great way to reach new people if you are new to the industry. If you’re unsure on how to go about this step, reach out to a digital marketing agency in the same space as you. For example, if you do car photography then an automotive digital marketing company may be the best fit.
Podcasts – Podcasts are really big nowadays. You might find some great local business podcasts or even lots of photography podcasts you might be able to discuss your work on. Don’t forget you need to make sure you have built a good base portfolio before people will treat you as a credible photographer.
How To Start An Automotive Photography Business?
To really simplify the process of creating an automotive photography business, here are a few points worth thinking about.
Decide – Set your mind on what type of car photographs you want to shoot. This could be private car sales images, local car events, motorsport, motor shows, press or advertising photography.
Build – Get started and build your portfolio over time with great examples of your work. Without examples, customers won’t be able to tell what you can achieve and will most likely look elsewhere.
Offer – Setup your business offering. Create a ‘package’ for what you are going to offer people. As an example, I can attend your event and capture the photography for the day for a fee of x. Take time to build a nice website with your business offering in plain English.
Advertise – Reach out to people that might need your services, let them know you are looking for work. This is what you charge and here are some examples.
If you are unsure on starting your own photography business, then reach out to other businesses in your local area and either work for free or ask for part-time work assisting.
If you are going alone don’t forget that being an automotive photographer, 80% of the job is in getting the work in the first place, so make sure you are touching up your business knowledge if you are looking to get involved in this space. I would suggest making sure you have the right insurance, get an accountant and understand the basic copyright in the photography industry.
Someone Has Stolen My Images
You might have been sharing your pictures online for some time already, it is pretty easy for people to find these images and reuse them on their websites. You can find where your images have been used by using a reverse image search tool.
What Is The Future Of Automotive Photography?
As the automotive industry moves forward, car photography will need to keep moving along with it. So how will it change? It is looking that electricity is the future for motor vehicles and there will be a continued uptake of technology in cars. Having the ability to accurately capture these new features of cars will help your work stand out from others.
It is also worth considering some other elements. We are always seeing a selection of new materials in use in cars that add new looks and textures, so by finding ways to show these off will help also.
Let us not forget the autonomous element that is on the way soon. Will we have our own car or share an autonomous one. Who knows? But consider how you might capture cars in the future if they don’t have an owner or a driver? If the focus wasn’t on the driving experience and more the passenger experience, what would you change with your photography?
How To Get Started In Automotive Photography?
We hear this all the time. Getting started in automotive photography could be simple. Get yourself a camera if you can afford a good one, great, if not just whatever you can get your hands on. Then get yourself out there and find some cars. Everyone has a mate that likes cars, offer to take some pictures of his car or go to local events and motor shows etc.
Spend as much time as you can in this hobby/profession.
Get yourself a copy of Adobe Lightroom and learn from others on YouTube. Edit your pictures and look to learn from the mistakes you make on each shoot. Then simply rinse and repeat. Every shoot you do you will improve, but let’s be honest, you won’t be brilliant when you start and it will most likely take you at least a year to get up to speed and find your own style. We would encourage you to shoot as many cars as you can.
Join local photography groups and ask for feedback from others. There are lots of groups on Facebook for all levels or car photographers. If you are struggling to get feedback on your images, we can certainly assist with that. Drop an email to paul.hadley@motorverso.com and I can certainly offer some quick feedback on your work.
But the most important part is getting out on a shoot every week, picking up that camera and putting in that time behind the lens. That is the secret, get out there and get started. ‘There is no substitute for experience’ – remember that.
How Much Should I Charge For Automotive Photography?
This is a difficult question for us to answer. As it always depends whether you are shooting a car for some sale listing pictures or it is for a high-end advertising campaign. But trying to offer you some value, read our points below.
If it is a hobby, just start with a price in your head that you feel your time is worth and then ask your client for that. If they accept that price then on your next commission add 5% and keep going up until people challenge your prices. Don’t forget the taxes that need to be paid if it is alongside a full-time job.
If you are a full-time photographer consider the cost of the equipment that you are using, cameras, lens, filters, bags etc. Total all that up plus the other overheads of your business (insurances, software, websites, advertising) and then add the amount you would like to personally earn from your business per year. Figure out how many shoots you could do in a year and then divide those figures that should give you an idea on your day rate. You will need to consider these points with your own situation, but this gives you an idea at least. Also, take into consideration the taxes on these payments.
Automotive Photography How To?
We have a selection of photography tips and information in this article above. We should have something to cover most elements of automotive photography. If we don’t just leave a comment below about what you would like to hear about and we should be able to assist in answering your question.
Why Should I Get Into Automotive Photography?
If you are interested in photography, you have the options of shooting anything you like, our advice would be to shoot something you know about and love. So if you love cars and the smell of fuel then automotive photography could be the right thing for you.
If you know all the car models on the road and enjoy looking at cars, you will certainly find yourself at an advantage as an automotive photographer, having a passion for the job will help keep you going when things get difficult.
What Lens To Use For Automotive Photography?
The answer here always depends, but we will give you the best answer we can. For general purpose car photography, we can probably break this down into a few different types of requirements.
Close Up Details – If you are looking at shooting close up details on the car, typically you would be looking at using a nice tight prime lens with a low f-number. Perhaps something like an 85mm f1.4 on the expensive end of things or a 50mm f1.8 on the more affordable end.
Mid-Range Shooting – This is probably what you would use for the bulk of the time, so this is where the wiser spend would be. I would look for a good 24-105mm f4 zoom lens. This will be wide enough for most scenarios and also allow you to get in tighter when you need to. Compared to the above-mentioned primes it won’t be as sharp, but it will give you the flexibility to keep moving and capture what you can without stopping and changing lens etc.
Panning Shots or Track Side Shooting – Taking pictures of cars from a distance or whilst they are driving past, you want to be looking for a longer lens, typically a 70-200mm lens will do the job here. Look for something that is stabilised in lens if your body doesn’t do it. These lenses can be very expensive, but if you need that focal length you don’t really have any other option.
There are lots of other lens options of course, we are just giving you a snippet of what might work if you are just starting out. We also have a guide here with lots more info on the best lenses for car photography.
Contributing Photographers: Ross Jukes, Jay Sidu & Paul Hadley.
This is great! Industry know-how really helps the group grow as a whole!
This is a very interesting article. Please, share more like this!