
Are you looking for a way to wire your new trailer and do you want to get one simple 4 pin trailer wiring diagram? Well, if that is the case, then you are at the right place because there will be a lot to cover on this topic where we will learn how this work is done the right way.
- Why Wire Your Trailer?
- Can You Do This DIY?
- 4 Pin Connector?
- Color Codes
- Supplies
- The Diagram
- How To Do It?
- 4 Pin To 7 Pin
- Conclusion
- F.A.Q
Wiring a trailer can be an extremely tricky job for beginners that are not into the electrical stuff. They do not have an understanding of signal wires, power wires, or ground wires. This is why you need to understand this first before you dive into connecting these wires to your trailer.
Because one bad connection and a fuse can blow in your fusebox or something else more extreme like melted wires and more. This is why you need to know this stuff. And we are going to help you out when it comes to this. The 4 pin trailer wiring diagram is the most essential thing that you will need to understand. And also the 4 pin to 7 pin trailer adapter wiring diagram. Since most cars are running 7 pin connections at the rear end.
But first, let’s start from the basics and learn why you need to wire your trailer and if you can pull this on your own. How much time it will take. Then we will dive into the basics of 4 pin trailer connector and understand the colors of the wires and the 4 pin trailer wiring diagram. After that, we will cover the supplies you will need to do this job and also how to do it step by step. So, if you want to learn more, follow along.
Why You Need To Wire Your Trailer?
Now let’s see why you need to wire your trailer. There are a ton of people who purchase trailers for a discount and they do not have wiring. Meaning that they lack the basic stuff that you need when the car is driving on the road. If you want you can jump to the wiring process and the 4 pin trailer wiring diagram. If not, keep up with us for a bit.
Why do you need to wire your trailer? The simple answer is to make it road legal. If you don’t have a wired trailer, you are a potential hazard for yourself and for the drivers around you.
People who drive behind you are relying on the hazard lights, the blinkers, and brake lights to see if they have something in front of them.
If you don’t have any of these lights, you are a potential hazard. You basically are waiting for the moment when someone will hit you in the rear and destroy your trailer and the cargo.
If you don’t have properly working brake lights, nobody will come to the conclusion that you want to stop your car. In this case, an accident will follow. That’s why you need to wire your trailer.
In addition to this, this type of trailer is also a target for police officers. It is highly likely that you will not get a plate for this trailer if it does not have the proper wiring.
And on top of that, you can get heavily fined. That’s why you need to wire your trailer and you need to learn the 4 pin trailer wiring diagram. But more on that in a bit. Let’s first see if you can pull this off alone.
Can You Wire Your Trailer Alone With Only A 4 Pin Trailer Wiring Diagram?
Now let’s discuss if you can pull off this job and if you can wire a trailer with only a 4 pin trailer wiring diagram?
The answer to this question is, of course, yes, you can pull it off. But before this, you need to do good research on how this is done and the supplies you need.
Besides reading this article on how to wire a trailer with a 4 pin wiring. You need also to watch a ton of videos of how this is done the right way.
By watching how other people do this work, it will be easier for you to imagine this diagram in your head and understand each wire where it goes.
Knowing this will make the wiring process on your car a lot easier and will guarantee a successful operation.
Because if you do this wrong, you risk getting a short in your circuit and having a lot of trouble with blown fuses or even melted wires on the trailer.
And you don’t want this happening to you because you will need to rewire the trailer again and repeat the whole process. Spending a ton of supplies and money in this process of wiring up the trailer. But how much time it will take you for this work? Well, that’s what we are going to cover in the following chapter.
How Much Time It Will Take?
Now before we discuss the 4 pin trailer wiring connector and the 4 pin trailer wiring diagram. Let’s see how much time it will take you to complete this task?
This really depends much on your knowledge of working with electrical components. If you have a good background when it comes to this stuff, you will be able to wire this trailer in a few hours with no problem. You can get this job done in a single day.
But if you are inexperienced and you are learning these things, you can expect that it will take you a bit longer than this.

Even if you do your research and get good input on this process and how it is done, it will take you longer because you are learning.
That’s why you need not rush things and make sure that you do everything the right way. It will probably take you a couple of days when you do this work for the first time. That’s why you need a proper 4 pin 4 wire trailer wiring diagram just to make sure that you don’t any mistakes.
What Is A 4 Pin Trailer Connector?
Now let’s learn more about what is a 4 pin trailer connector before we cover the 4 pin trailer wiring diagram. This will be extra useful for beginners who are not familiar with this type of connector and want to learn the basics.
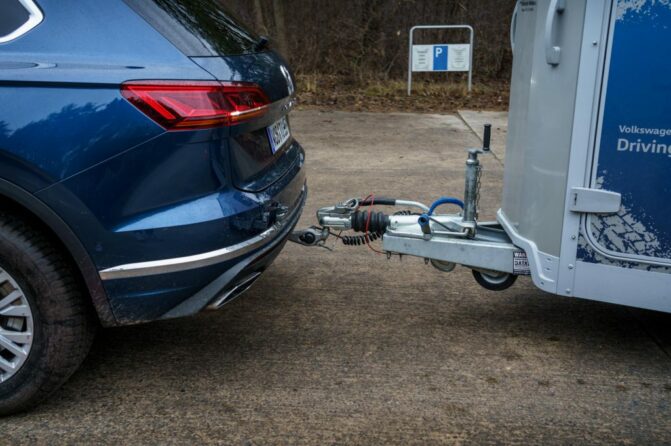
A 4 pin connector is basically a connector used to connect the trailer end with the vehicle. There are flat connectors and round connectors. Most of the connectors that you will see will probably be round and 7 pin. So, you might be wanting to learn the 4 pin to 7 pin trailer adapter wiring diagram. But more on that later on in the article.
But what this 4 pin means in the first place? What makes this 4 pin trailer wiring diagram so desired?
Well, this type of connector is used mostly on small trailers that are attached to cars. These trailers are often used for towing a car, a boat, or something similar.
Basically, the 4 pin connectors offer you the basics when it comes to connecting your trailer. You get the brake lights, tail lights, license plate markers, and turn signals.
The 4 pin connector is also the easiest to wire up and you will have no trouble as a beginner doing this task since there are 4 basic wires that go around the car. That’s why you need to learn the 4 pin flat trailer wiring diagram. But more in a bit after we cover all of the colors that are used on this connection.
The color of the wires will help you not get lost in the process and do an excellent job in the end. So, if you want to learn more, follow along.
4 Pin Trailer Wiring Color Codes
Now before we cover the 4 pin flat trailer wiring diagram. Let’s cover some of the colors that you will be dealing with. As you probably know, all wires need to be in different colors in order to avoid confusion.
The colors really are not something that should be precise. The main goal is to get different colored wires to make sure that you don’t get confused. But some colors are predominantly used for this application.
The white wire is usually a ground wire. This wire is attached to the frame of the trailer and you need to make sure that there is contact with the metal and not with the paint if you want to get a proper ground. This is why you need to drill a hole and attach a bolt, then connect the white wire to the chassis.
The second color is brown color. This color is used for the taillights and the running lights.
The third wire color is the yellow wire. The yellow wire is in charge of the left turn signal.
The last is the green wire. The green wire is in charge of the right turn signal.
So, to sum things up, white is the ground connection, brown is for the taillights, and the marker lights. The green is for the right turn signal and the yellow is for the right turn signal.
When trying to do this work, you will need an 18 gauge wire, which is the minimum for the 4 pin connector. For the ground, you can use a 16 gauge wire. Overall this is the information that you will need for wiring up the trailer.
Supplies You Will Need To Wire Your Trailer
Now let’s learn the supplies you will need when it comes to the 4 pin trailer wiring diagram. As you probably know, there will be supplies needed in order for you to do this job effectively.
You can go in two different routes when it comes to wiring up your trailer. You can start from the ground up and purchase only 18 gauge wires and build your wiring in a custom fashion.
Or you can purchase a complete wiring kit that comes with the wiring as well as manuals, diagrams, taillights, and other bits and pieces.
If you are a complete beginner, you can go for this route and tackle this issue this way. Or if you want some challenge. You can go for the custom route.
Doing everything by yourself can be a real pain if you are a beginner. But if you want to learn, then this will be the right way that you can pull this off. Never be afraid of challenges because that’s how you learn and grow in life.
In a year you can be one of those guys who makes money by wiring trailers for others. Who knows, every knowledge is beneficial. But what about the 4 pin trailer wiring diagram? More on that in the following chapter.
4 Pin Trailer Wiring Diagram
Now let’s discuss the 4 pin trailer wiring diagram. What is important for you to know when it comes to this wiring diagram?
Well, the first thing for you to know is to know what wire where it goes. You cannot use the wrong wire for different things let’s say. You cannot route a wire intended for the blinkers to the brake lights. If you do this, your wiring will not work.
Remember the colors and the pattern that you need to follow from the connector, until the end of the brake lights, tail lights, and other components.
Open up google and see the connectors, the male and the female. The male connector is the one that you will basically wire, while the female is the connector from the side of the car where you plug in the wires.
Check the wires in the female connector and make sure that the wires on the male connector are laid out in the same manner. This way you will never make a mistake and connect something the wrong way.
Also, remember the colors and their purpose. As we listed above, the white is for the ground, tail lights and brake lights are in red color, the right turn signal is green and the left turn signal is yellow.
For more information on the visual perspective of how this diagram should look like on a trailer, you can browse the phrase “4 pin trailer wiring diagram” or “4 pin flat trailer wiring diagram”. That’s how you will visually understand what everything should look like.
How To Wire Your Trailer – All The Steps Needed
Now as we covered the 4 pin trailer wiring diagram and we learned the colors of the wires and the connectors needed. Let’s now focus on how to wire a trailer.
You need a detailed guide on how this is done the right way. If you don’t have a detailed guide full of useful information, there is a high chance that you could do something wrong and mess things up. And in the following chapters, we are going to help you out. So, follow along.
1. Buy Supplies
Now as we covered the 4 pin flat trailer wiring diagram, let’s discuss the first thing that you will need to do this job the right way, and that is the supplies.
Luckily for you, there are a ton of kits out there on Amazon that offer you the complete package. From the connector, wiring, and lights. They have everything inside. It is up to you to read the manual and learn how this is done the right way. With these kits, there is also a 4 pin trailer wiring diagram and all of the steps necessary.
But if you want to do this thing in a custom manner, you can purchase all of the pieces from the kit separately. It is up to you how you want to tackle this type of work. Going this route will require deeper knowledge and understanding of what components you need and how to route it properly. So, beware of this.
2. Make Sure That You Connect The Ground
Now let’s start connecting stuff. The first thing you will need is to make a ground connection. The ground wire is the white one. This wire needs to be attached to the frame of the trailer. Remember the 4 pin trailer wiring diagram? This wire was for the ground. A ground is essential if you want to avoid causing a short.
This wire needs to be mounted on exposed metal, not on paint. This means that you will need to drill a hole and then tighten the ground wire with a bolt. Once you do this, you can move to the following steps.
3. Run The Wires Along With The Frame
Now you can pay close attention to the 4 pin trailer wiring diagram and the way you route the wires.
The brown wires go to both sides, left and right. They should be separated through a Y connection. And then you should route then side the frame of the trailer until you reach the tail light mounting area. There you connect the wires to the brake lights.
Then comes the green and yellow light. The green is the right turn signal and the yellow is the left turn signal. They both should be routed in the same fashion along with the frame to the rear of the trailer and then connected to the blinkers. Then you are good to go.
4. Connect The Trailer With The Vehicle
Since we wired everything based on the 4 pin trailer wiring diagram, now we can connect the trailer to the car.
This is a fairly simple process. You just get the 4 pin flat connector and find the female connector that should be located next to the tow hook. Then connect both of these connectors together, simple as that.
5. Test If Everything Works
Once you got everything connected you can start the car and let it run like this. Then test all of the lights that you connected, the blinkers, taillights, and brake lights. Everything should work nicely. If something isn’t working as it should. You should check the connections and see if you attached everything as it should.
If you can’t sort out the problem. Then better get professional advice from a car electrician or take your car to a shop and get it sorted out. There should be a small correction to it and you will be good to go. Overall, that’s it when connecting a trailer with a 4 pin trailer wiring diagram.
4 Pin To 7 Pin Trailer Adapter Wiring Diagram
Now as we covered the 4 pin trailer wiring diagram. Let’s discuss the 4 pin to 7 pin trailer adapter wiring diagram.
This is needed because some trailers have 7 pin connectors but the truck that you plan to attach this trailer to a trailer that requires a 4 pin connector. This means that this 7 pin trailer will not fit this connector.
For this work, you will need a special adapter. These come as a whole unit and you will only need to connect it, that’s it. No need to learn the diagram for this purpose.
Equipping Your Vehicle with Proper Trailer Wiring
- Every vehicle towing a trailer requires a trailer wiring harness to safely connect the taillights, turn signals, brake lights, and other necessary electrical systems.
- There are different solutions to provide a perfect fit for your specific vehicle if it’s not equipped with working trailer wiring, including custom wiring, splice-in wiring, and replacement wiring.
- Custom wiring is the ideal solution for installing trailer light wiring on your vehicle, as it is a vehicle-specific harness that requires no splicing and provides a standard trailer connector output.
- Custom wiring harnesses usually require two or more connection points, but splicing and soldering are still not needed.
- A taillight converter may be required to equip your vehicle with the proper trailer light wiring connection if custom wiring is not available for your particular make and model.
- Plugs and sockets are available in all standard formats and can be spliced into your existing trailer plug wiring if the trailer plug wiring on your vehicle or trailer is damaged or not working correctly.
- Following the standard method for wiring a trailer connector is vital to the safety of your vehicle while towing.
- Different wire colors are used for different functions in various trailer wiring configurations, such as 4-pin, 5-pin, 6-pin, 7-way round, and 7-way RV blade.
- The ground wire color on all trailer plug types is always white, and other colors vary in function, depending on the configuration.
- Different trailer types are equipped with different plug types based on their electrical components.
Conclusion
In this article, we have covered the 4 pin trailer wiring diagram. First, we learned why you should wire your trailer and make sure that you are safe on the road. Then we learned if you can pull this off by yourself and the answer is yes. You will need to learn the basics of how to wire stuff and you will have no issues.
After that, we have covered the colors that the wires come in and we explained each of these colors. We also discussed the supplies you will need to do this work. There are full kits that are bolt-on. Lastly, we have covered the procedure of how this is done the right way.
F.A.Q
Now let’s answer some frequently asked questions.
What Is A 4 Pin Connector
A 4 pin connector is a trailer connector that allows you to connect the trailer with a vehicle. This is essential because you need proper signalization on the road so the people behind you see when you are about to take a turn or come to a stop.
Skill Level Required To Wire A 4 Pin Trailer
The skill level required for this work is medium. You need to have an understanding of how everything works so you be able to connect the wiring as it should. Most trailer wiring comes as a full kit and it is really easy to do this type of work on your trailer.
Why You Should Wire Your Trailer
Wiring a trailer is really essential. Namely, without proper wiring, you could get involved in an accident since the ones behind you can’t see if you are turning or coming to a stop. You can also get fined if you don’t have a properly working signalization.