
My Summer Car is not a game… It’s a fever dream. That’s something our My Summer Car Guide tries to break down. This is an imagination of what happens if you got transported into the middle of a rural Finnish countryside. Surrounded by a completely wacky world that can humor you as much as it can kill, you’re then tasked with building a car.
Though for an experience this silly, the car building part of the game is surprisingly meticulous and detailed. That will be the premise of our My Summer Car guide; how to actually put the car together. There are many side quests and things that can distract you from anything car-related.
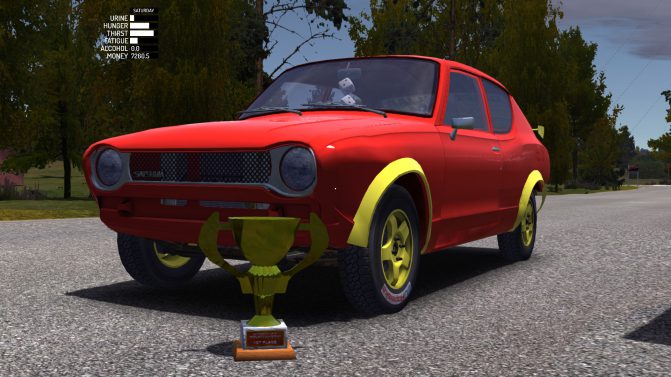
As such, we’re going to focus on the main objective of the game; rebuilding your dad’s old Datsun 100A. Otherwise, this simple walkthrough/overview will be a fully-fledged novel by the time we reach the penultimate chapter. So, you’ve dropped into the world of MSC, and you have no idea what to do?
Well, our My Summer Car guide will hopefully get you up and running. In this guide, we’ll not only look at what parts you need and how to assemble everything. But, we’ll even take a deeper dive into all the core components. As well as, how to properly tune your car and troubleshoot issues with it.
- Pre-Build Checklist
- A Few More Things To Do
- Things To Buy For Your Car
- Building The Satsuma
- Final Conclusion
- Frequently Asked Questions (FAQs)
My Summer Car Build Guide
Woah, hold on. Before heading straight for the garage and getting greasy, there are a few things you should probably do first. First of all, it’s worth bearing in mind that MSC has a permadeath mechanic in place, thus doubling this to become a survival game.
It means that you need to take care of your in-game player. They too have basic requirements such as having to eat, drink and get some sleep. For our My Summer Car guide, it won’t be enough to just build the Satsuma and ignore this.
If you do that, then the player could die, and you’ll have to start all over. Besides, you’re going to need to head to town and get some parts to finish that build, anyway. So, be sure to get enough food and drink to keep you stocked up while you’re there.
So, before we get into anything else, you’re going to want a van. In the most recent updates of the game, the van – a Hayosiko Pace – will spawn by Uncle Kesseli. Toivo Kesseli is the player’s uncle, and you can find his house near yours.
You’ll be prompted and hinted about Uncle Kesseli’s van through a note that the player’s parents left on the fridge. Here, the game tells you that you can borrow Uncle Kesseli’s van. However, once you get in the van, a time will count down to tell you how much time you have left before it needs to be returned.
If you somehow can’t get the van, then you could use a boat, moped, or tractor. The main town of the game, Peräjärvi is quite a distance away. These vehicles should spawn near the house.
My Summer Car Map
You’re going to need a vehicle to haul back anything you buy in the town. It would be prudent as well, that before you continue on our My Summer Car guide, you should get a few jerrycans. There’s a black diesel canister in the barn, and there’s a green gas can by the back left corner of the garage.
Bring along both. Now, let’s get in the van and head into town. Hopefully, you’ve gotten used to the game’s controls by now. After this, you can start by driving down the dirt path. Just after a set of railroad tracks, there should be a three-way intersection at the end of this dirt path that leads to the player’s house. Turn left, and follow this road until you read a four-way intersection.
Now, take a right, and you should end up by a paved road, which is the game’s highway. Turn left and get onto the highway. Keep driving, and then take the fourth left-hand side exit in order to reach the game’s main town and urbanized area, Peräjärvi.
As a pretty large town, each exit on the highway should more or less lead you here. Nonetheless, the main point of interest that we want to look at is Teimo’s shop. It should be the first building on the left as you take that highway exit.
If you need a visual cue, there should be fuel pumps outside. Remember those jerrycans from earlier? Fill up not only the van but also those two extra canisters. While you’re inside Teimo’s shop, buy up some food and drinks to get you started.
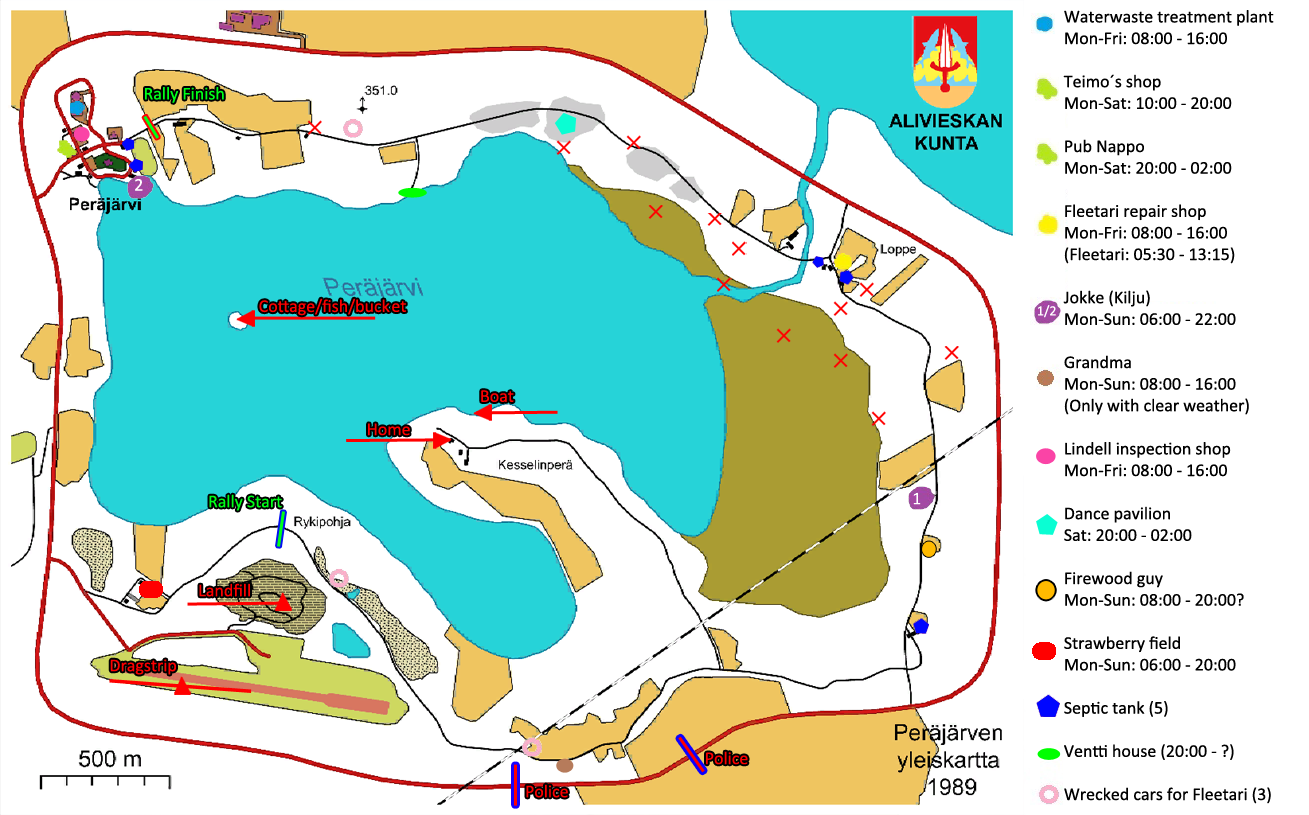
“Peräjärvi my summer car map” by Leonardoctx is licensed under CC BY-SA 4.0 ![]()
![]()
![]() .
.
What Are You Supposed To Buy From Teimo’s Shop?
If we take a glance at your garage at (the player’s) home, then there should already be a few parts that are ready and waiting to be fitted on the Satsuma. Most of the other bits and pieces, however, need to be acquired in the game.
It could be easily bought from Teimo’s shop and a few other locations. However, certain parts could instead be found for free. One example is how you can find the starter wheels for your car by the Abandoned Mansion.
View this post on Instagram
Still, much of our My Summer Car guide will hinge on buying these parts from Teimo’s shop. So, be sure to have enough money on hand. If you don’t, then you could complete a few jobs and tasks to earn markka, or ‘mk’, as the local currency is called. It’s for this reason that we’ve recommended taking the van to town, as it could fit more stuff in there than some other vehicles.
A Shopping List While You’re At Teimo’s
Here’s a short checklist of the things that you’ll be needing to buy while you’re in Teimo’s shop:
- Alternator Belt – You’ll only need one, which should cost 295mk.
- Battery – The Satsuma needs a new one as the old battery is very nearly dead. It’s the most expensive part of the game, costing 495mk.
- Coolant – Two bottles are going to be necessary to properly fill up the Satsuma. At a price of 195mk per bottle, this should cost you another 390mk.
- Motor/Engine Oil – Once again, you’ll want two bottles. At 149mk per bottle, two should cost you 298mk.
- Brake/Clutch Fluid – As each bottle only holds so little, you’ll need to buy four of them here. It’s priced at 35mk for each bottle, which will round off to 140km in total.
- Spark Plug Box – This single box will contain four spark plugs underneath. Since the Satsuma has a four-pot engine, you’ll only need to pay 99mk for one.
- Light Bulb Box – Containing a single bulb each, you want two boxes for the Satsuma’s headlights. At 27.95mk each, the pair is going to cost you 55.90mk.
Anything Else You Need To Get?
Those parts that we highlighted above are absolutely necessary for you to properly build the Satsuma to completion. But as we’ve noted so far in our My Summer Car guide, there’s more you should get.
For starters, you’ll need to spend money on paying for gasoline and diesel that you’ve just pumped up. While you’re at Teimo’s, remember the bodily essentials. Sausages are the most efficient food item when it comes to filling up your hunger bar.
Beer is the best liquid in the game, cigarettes should help your character relieve stress in a pinch. Buy as much as you think is necessary before packing up the van and heading back home.
You might even want to buy a bottle of two-stroke fuel for 99mk. While not required for the Satsuma, you’ll find it handy if you need to use the boat or moped. In total, you’ll find that you could easily spend far over 2,000mk here alone.
Just Before You Start With Building The Satsuma…
There are a couple more tips and tricks for our My Summer Car guide before we get to building the Satsuma. Firstly, you should know that MSC also has a damage system for your car and its many parts.
Some components will get damaged over time and necessitate a replacement. Most of these ‘damageable’ parts that you’ll get at the start of the game are almost always in near-critical condition. You could have these parts delivered and serviced at the Fleetari repair shop.
This is a cheaper way to get them back to running order. However, we’ve found that it’s best to just go ahead and buy these parts completely brand new from Fleetari’s. Though more expensive, it will relieve a huge sore point later on as you now technically have more robust components that won’t have to be replaced so soon.
View this post on Instagram
After this, you should drop by Teimo’s once again – or while you’re still there – to order a few extra nice to have. Only two are recommended; the fuel mixture gauge and ratchet set. You can find them through the parts catalog by Teimo’s.
The fuel mixture gauge will set you back 549mk and is used to monitor the air-fuel ratio for the Satsuma’s carburetors. The ratchet set is another 359mk and will be very handy to have as it can tighten bolts that much quicker. You can manage using the free spanner set you have at home, but this ratchet set will make life that bit easier.
What Do You Need To Do To Build The Satsuma?
At this stage in our My Summer Car guide, we should have everything that we need parts-wise to rebuild your Datsun. This includes the bits and bobs that spawn naturally by the player’s home or garage, as well as the things that we bought or picked up along the way.
As we mentioned much earlier, the car building aspect of MSC is actually very realistic, and almost simulator-like in feel. You need to individually pick up every single component, and align them in place before bolting them on.
There are a whole lot of different parts that require attaching, from the engine, chassis, and so on. For our My Summer Car guide, we’ll take a closer look at all the individual items on the Satsuma that you’ll have to put together.
We’ll even let you know how many nuts or bolts, as well as their sizes that are important for that particular part. So, if we use the term “2x10mm”, this means that if you want to put them together, you need 2 bolts or nuts, with the 10mm spanner or ratchet.
Some components instead require a screwdriver. Other times, the game asks you to interact by putting them together by using the scroll wheel on your mouse. Thus, you can scroll up or down to tighten and loosen them, but be careful to overtighten them. Meanwhile, there are other parts that just plug and play, without needing any fitting at all.
My Summer Car Engine Guide
In order of what you should do first, here are all the items that need for assembling the engine in our My Summer Car guide…
- Crankshaft – Fits directly onto the engine block.
- Main Bearings – 2x9mm; there are three in total. Each main bearing is numbered, and will only fit in its designated slot. For instance, the #1 bearing needs to bolt on near the gearbox.
- Pistons – 2x7mm; there are four in total. It sits together with the engine block and crankshaft.
- Head Gasket – Fits directly onto the engine block.
- Cylinder Head – 10x7mm; it sits on top of the head gasket.
- Spark Plugs – There are four in total for the four cylinders. You’ll need to scroll up once you have the spark plug in place until it’s tight.
- Rocker Shaft – 5x8mm; it must be bolted onto the cylinder head.
- Camshaft – 2x5mm; it must be fixed onto the engine block. It’s also important that you align it properly before latching the timing chain on. You can make alignments with one 10mm bolt. All you need to do is match up the two arrow pointers. There’s a larger arrow by the edge of the camshaft gear (more below), and a smaller one by the crankshaft gear.
- Camshaft Gear – 1x10mm; needs to be fitted onto the camshaft. Continuing our point above, it’s crucial to align this accurately to avoid damaging the engine.
- Timing Chain – It has to go on before the timing cover, connecting the camshaft and crankshaft gears.
- Timing Cover – 6x6mm; attached to the engine block, just over the timing chain.
- Water Pump – 5x7mm; fitted to the timing cover.
- Water Pump Pulley – 4x7mm; bolted onto the water pump.
My Summer Car Under-The-Hood Components
- Crankshaft Pulley – 1x11mm; often mistakenly fitted at the start, you should only fasten this after the timing cover to prevent it from getting in the way.
- Distributor – Screwdriver; it’s placed on the side of the engine block, where you’ll find the spark plugs.
- Alternator – 1x7mm, 1x10mm, and a screwdriver. Before tightening up the alternator, it will be easier to put the alternator belt on first. Just tighten the two bolts as mentioned to secure the alternator, and then adjust the tension of the belt. Once you have the car up and running, you should come back and readjust the alternator. Loosen up both the alternator and alternator belt slightly to prevent them from snapping.
- Alternator Belt – Fixed onto the alternator.
- Engine Plate – Attached directly onto the engine block.
- Starter – 2x7mm; it will need to be connected to the electrics later on.
- Carburetor – 4x8mm; it can be fastened to the cylinder head. Air filters are optional (2x6mm).
- Headers – 5x8mm; fitted to the cylinder heads, it connects the engine to the exhaust pipes.
- Flywheel – 6x7mm; this is the first part that will be fitted on the transmission side of the engine block.
- Clutch Assembly – 6x6mm; this entire piece should also comprise the clutch pressure plate and clutch disc altogether.
- Oil Pan – 8x7mm, and 1x13mm; connected to the bottom of the engine block.
- Inspection Cover – 4x7mm; this allows the player to inspect the gearbox without taking the entire engine out.
- Transmission – 6x7mm, and 1x10mm; bolts right onto the engine block.
- Drive Gear – 7x6mm; fixed onto the gearbox.
- Rocker Cover – 6x7mm; joined onto the cylinder head, it sits on top of the rocker shaft.
- Fuel Pump – 2x7mm; attached to the engine block.
- Oil Filter – Screwed in by hand, it goes near the front of the engine block.
Engine Assembly Guide: A Step-By-Step Breakdown
For more context, here’s a more thorough step-by-step guide on putting together the engine bits…
1. Assembling the Engine Block
Start with the heart of your car, the engine block. Place it on a spacious table. Attach the crankshaft, which does not require any screws. Next, secure main bearings 1, 2, and 3 using 9mm screws (two each). Once that’s done, affix pistons 1, 2, 3, and 4, each with two size 7 nuts.
2. Setting Up the Cylinder Head and Headers
Now, it’s time to install the head gasket (no screws needed) and the cylinder head using 10x 7mm screws. Next, attach the headers using five 8mm screws. Once everything is in place, lay the motor hoist on the engine. Fasten the engine with two 10mm screws. The engine should align correctly as you tighten each screw.
3. Installing the Carburetor, Rocker Shaft, and Rocker Cover
Next, we attach the carburetor using four 8mm screws, followed by the rocker shaft using five 8mm screws. Don’t worry about adjusting the valvetrain yet; we’ll come back to it later. Finally, secure the rocker cover with six 7mm screws.
4. Adjusting the Camshaft, Timing Belt, and Cover
Attach the camshaft with two 5mm screws and the camshaft gear with a single 10mm screw. Then, place the timing belt (no screws required) and attach the timing cover with six 6mm screws.
5. Attaching the Water Pump and Pulleys
Now, attach the water pump using five 7mm screws, followed by the water pump pulley with four 7mm screws, and then the crankshaft pulley using an 11mm screw.
6. Installing the Alternator and Fan Belt
For this step, attach the alternator using a 7mm screw on top and a size 10 nut on the bottom. Then, attach the fan belt (no screws required). Adjust the alternator so it slightly touches the fan belt using your mouse scroll wheel. Once adjusted, tighten the screw.
7. Assembling the Engine Plate, Starter, and Flywheel
Attach the engine plate (no screws required), then attach the starter with two 7mm screws. Next, secure the flywheel using six 7mm screws.
8. Setting up the Clutch Components
This is a three-step process. First, put the clutch pressure plate into the clutch cover plate. Then, put the clutch disc into the clutch pressure plate. Finally, attach this entire assembly to the engine using six 6mm screws.
9. Finalizing the Engine Assembly
To wrap up the engine assembly, attach the oil pan with eight 7mm screws and a single 13mm screw. Then, secure the gearbox using six 7mm screws and a 10mm screw. Lastly, attach the drive gear using seven 6mm screws.
10. Setting Up the Spark Plugs, Fuel Pump, and Distributor
First, tighten the spark plugs using the spark plug wrench. Then, attach the fuel pump using two 7mm screws. Lastly, secure the distributor with a 6mm screw.
Engine Installation and Under-Hood Work
Once you’ve assembled the engine, it’s time to install it into your car and connect everything else…
1. Hoisting the Engine Into the Car
Carefully use the hoist to lift up the engine. Move the hoist over the car, then lower it carefully. Once the engine aligns, 11mm bolts will appear — two on the front and one on the rear. After alignment, unscrew the engine from the hoist, raise the hoist, and set it aside.
2. Working on the Battery and Electrics
Place the battery next to the engine and attach the electrics to the engine compartment using two 8mm screws.
3. Installing the Fuel Strainer, Radiator, Hoses, and Oil Filter
Attach the fuel strainer with an 8mm screw. Then secure the radiator with four 7mm screws. Now, attach radiator hoses 1, 2, and 3, and tighten the oil filter by hand.
4. Setting Up the Master Cylinders
Place the clutch and brake master cylinders between the engine and the car frame using two 8mm screws on the engine side and one 9mm screw each on the cabin side.
5. Attaching the Clutch Lining and Brake Lining
Attach the clutch lining with two 7mm screws. Then attach the brake lining with eight 7mm screws. Tighten the wheel nuts with 7mm screws.
6. Installing the Fuel Tank and Halfshafts
Attach the fuel tank with seven 11mm screws and one 12mm nut (vital for preventing fuel leakage). Then, tighten the halfshafts to the engine with three 9mm screws.
7. Adjusting the Gear Linkage, Gear Stick, and Handbrake
Attach the gear linkage using three 5mm screws, two on the bottom and one on the top. Attach the gear stick with three 6mm screws, and then secure the handbrake with four 8mm screws.
8. Final Touches: Exhaust Pipe, Muffler, and Fuel Tank Pipes
Lastly, attach the exhaust pipe using one 7mm screw on the back side and two 7mm screws on the engine side. Then, attach the exhaust muffler with one 7mm screw. Lastly, attach the fuel tank pipe (no screws needed).
My Summer Car Fluids
Your Summer Car journey is incomplete without a deep understanding of the car fluids necessary for the smooth running of your vehicle. In this section, we’ll dive into the critical fluids you need to know about, how to use them, and why they’re indispensable.
1. Motor Oil: The Heartbeat of Your Car’s Engine
Motor oil is the lifeblood of your vehicle. It lubricates your car’s engine, reducing friction and heat build-up, which is vital for peak performance. To add motor oil, open the rocker cover and pour the oil in. The quality and quantity of motor oil in your car decline over time, affecting your car’s performance.
A key indicator of your oil’s health is its color. Darker oil signifies poor quality, suggesting that it’s time to change the oil and the oil filter. To do this, remove the size 13 bolt from the oil pan, let the old oil flow out, and then secure the bolt back on. Refill with new motor oil and remember to replace the oil filter.
2. Radiator Coolant: Your Car’s Cooling Agent
Radiator coolant is crucial for cooling down your car’s engine. This fluid can be bought from Teimo’s store, but there’s a handy tip to save money.
Over-hydration isn’t a problem in this game. Drink plenty of water, so much so that your urine bar turns red. Then, aim for the radiator hole and press P. While it may take a few tries to get your aim right, this method is just as effective as using the store-bought coolant.
3. Brake and Clutch Fluid: Enhancing Control
Brake and clutch fluid are critical for maintaining control over your car. The brake and clutch master cylinders need to be filled up with this fluid. It’s good to have a little extra on hand because if you forget to tighten any brake lining nuts, the fluid may seep out.
4. Gasoline: The Fuel Powering Your Journey
The main fluid powering your car’s journey is gasoline. Open your green gasoline jerrycan, and pour the fuel into the fuel tank pipe. Make sure you pour all of it into the car to ensure a smooth and interruption-free journey.
5. Gearbox Oil: Ensuring Smooth Gear Transition
Your car’s gearbox houses an essential fluid, gearbox oil. It aids in the smooth transition between gears while driving. To fill it, unscrew the cap on the gearbox, pour the oil, and secure the cap back on.
6. Windshield Washer Fluid: Maintaining Visibility
While it might seem minor compared to other fluids, windshield washer fluid plays a crucial role in maintaining clear visibility. This fluid keeps your windshield clean, especially useful when you encounter muddy roads in the game.
Remember, maintaining your car’s fluids isn’t a one-time job. Constant monitoring and replacement of these fluids are necessary for the optimum performance of your Summer Car. This comprehensive knowledge of car fluids will certainly add to your overall gaming experience. Enjoy the ride!
My Summer Car Chassis, Steering, Suspension, & Wheels
Once you’ve completed the engine part of our My Summer Car guide, it’s time to get to the chassis. You should consider jacking the car off the ground using the floor jack. Or, you could (carefully) push the car into the garage, where you can work on it from the pit.
Before we get into completing the rest of the bodywork, it would be helpful to lift the engine out of the Satsuma. Once you’ve already completed assembling the engine, you can attach the main block to a hoist (2x10mm). Once the chassis is done and ready, you can then very slowly lower the finished engine back in.
My Summer Car Steering And Suspension
- Sub Frame – 4x10mm; it’s fastened under the front part of the car.
- Wishbones – 2x10mm each for the two wishbones. As part of the suspension, it is attached to the subframe.
- Spindles – 1x12mm each for the two spindles. They are connected to the wishbones.
- Steering Rack – 4x9mm; it needs to be fitted onto the subframe.
- Steering Column – 2x8mm; it has to go onto the steering rack.
- Steering Rods – 1x12mm each for two rods; it’s joined with the struts. Or, 1x14mm if you need to adjust the steering rods. There are 120 clicks from lock to lock, so you’ll need to scroll up and down 60 times in each way.
- Disc Brakes – 1x14mm each for two in the front; they are attached to both the spindles and half-shafts.
- Half-shafts – 3x9mm and 1x14mm each for two half-shafts; conjoined with the gearbox and disc brakes.
- Struts – 4x9mm, 3x10mm, and 1x12mm each for two struts; which are connected to the steering rods and spindles.
- Trail Arms – 2x12mm each for two trail arms; fixed to the back of the car.
- Coil Springs – Two units at the rear of the car after the trail arms.
- Shock Absorbers – 1x12mm and 2x6mm each for two shock absorbers; both for the rear of the car.
- Drum Brakes – 1x14mm each for two drum brakes for the rear wheels.
- Wheels – 4x13mm each for all four wheels.
Step 1: Front Suspension Assembly
Start off by placing the floor jack under the front bumper of the car and using the lever to raise the vehicle to its limit. Once you have the car raised, begin working on the front part of the frame.
Attach the subframe first, securing it with four 10mm screws. Follow this up by attaching the front left (FL) and front right (FR) wishbones with two 10mm screws each. Next, attach the FL and FR spindles with a single 12mm screw each.
Once the frame is ready, move on to the brakes and halfshafts. Put the two disc brakes on, but don’t tighten them just yet. Instead, proceed to install the two halfshafts with three 9mm screws each. Only after the halfshafts are secured should you go back and tighten the disc brakes using one 14mm screw each.
The next components to attend to are the steering rack, steering rods, and struts. Begin by attaching the steering rack with four 9mm screws. Put the FL and FR steering rods and struts on, but like the disc brakes, don’t tighten them just yet. Instead, tighten the steering rods with a 12mm screw each and a size 14 adjustment nut.
After this, go ahead and tighten the struts using three 10mm screws on top and four 9mm screws on the bottom. To finalize the front suspension assembly, attach the FL and FR wheel steels using four 13mm screws each and install the steering column with two 8mm screws.
Step 2: Rear Suspension Assembly
Lower your frame and move the floor jack to the rear bumper of the car before raising the vehicle back up. Once the car is raised, start the assembly by attaching the rear left (RL) and rear right (RR) trail arms with two 12mm screws each. After the trail arms are securely in place, attach the coil springs, no screws are needed for this step.
The next components to install are the two shock absorbers. Attach these using a 12mm screw each at the top, and two 6mm screws each at the bottom. Once done, move on to installing the drum brakes using a single 14mm screw each.
Finalize the rear suspension assembly by attaching the RL and RR wheel steel with four 13mm screws each.
Step 3: Wheel Adjustments
Your vehicle is almost ready, but before you can start driving around, you’ll need to adjust your wheels. Find the nut on the inside of each front wheel and turn it to its absolute limit. Note that the nut can turn indefinitely, but after a certain point, the wheel will stop rotating along with it, indicating that it’s at its limit.
Once at its limit, turn the nut in the opposite direction 60 times. Repeat this process for the other wheel.
My Summer Car Satsuma Wiring, Hoses, Interior & Exterior Trim
This part of our My Summer Car guide will look at finishing up the rest of the car. This includes the electrics, exterior body panels, and trim, as well as the interior. A few other key mechanicals are in this section as well.
- Hubcaps – Four of them, fitted straight onto the steel wheels.
- Battery – 2x8mm; it’s installed along with most of the wiring.
- Wiring Mess – This is an extensive series of cabling that powers all the car’s electrics. There are 26 wires in total that you have to connect. It’s wise for you to have this in the car first before continuing with any other electrical components. Once they’re all fixed onto the car, then you can connect the wiring mess together.
- Electrics – 2x8mm; with the ignition coil on the other end, this connects the spark plugs to the distributor.
- Fuel Strainer – 1x8mm; placement can be found near the fuel pump.
- Radiator – 4x7mm; placed on the front end of the car, with a cap on top to later fill in the coolant. The basic radiator can fill in 5.4 liters of coolant.
- Radiator Hoses – There are three hoses in total, all of which can be fastened with screws.
- Clutch Master Cylinder – 1x9mm and 2x8mm; fitted within the engine bay. You can later twist open the cap to fill in the brake/clutch fluid that we bought earlier. It can accommodate 0.5 liters of fluid.
- Clutch Lining – 2x7mm; attached to the back wall of the engine bay. It attaches to both the gearbox and clutch master cylinder.
- Brake Master Cylinder – 1x9mm and 2x8mm; also placed in the engine bay, which you can later fill in with brake/clutch fluids.
- Brake Lining – 11x7mm; seven of the nuts and bolts are fitted inside of the engine bay. The other four are for each wheel.
My Summer Car Wiring
- Steering Wheel – 1x10mm; you can get other, optional wheels.
- Fuel Tank – 7x11mm, and one 1x12mm bolt for the fuel line.
- Gear Stick – 3x6mm
- Gear Linkage – 3x5mm; fixed onto the gearbox.
- Dashboard – 2x10mm; you can then link up to other instruments here. This includes the RPM gauge, dash-mounted clock, the entire dashboard cluster, and meters, as well as a radio.
- Headlights – 2x7mm; it’s recommended that you fit the rest of the wiring beforehand.
- Grille – 2x6mm
- Bumpers – 2x8mm each for the front and rear.
- Rear seat – 2x9mm
- Front seats – 4x9mm each for both sides.
- Handbrake – 1x5mm and 4x8mm
- Exhaust pipe – 3x7mm; attaches to the bottom of the car from the engine headers.
- Exhaust muffler – 1x7mm
- Doors – 4x10mm each for either side.
- Fenders – 5x5mm each on the front wings.
- Fuel Tank Pipe – Attached straight onto the fuel tank.
- Bootlid – 4x6mm
- Rear lights – Once again, it’s best you do this after connecting all the wiring.
- Hood – 4x6mm
Step 1: Car Interior Assembly
Now that your vehicle can potentially run, it’s time to focus on the interior to ensure a comfortable ride.
Start with the dashboard by attaching it using two 10mm screws. Once the dashboard is securely in place, arrange your dashboard meters on the table, choosing between the RPM gauge and the clock gauge. Once decided, install the chosen meter into the display with two 7mm screws, then attach the meter display to the dashboard with two 6mm screws.
With the dashboard in place, it’s time to install the seats. Secure the rear seats with two 9mm screws. Then, depending on your preference, choose between a normal back panel or a subwoofer panel. No screws are needed to install your chosen panel. After that, secure both the driver’s seat and the passenger’s seat with four 9mm screws each.
To finish off the interior, attach the stock steering wheel to the steering column using a single 10mm screw. Insert the radio into the dashboard, completing the interior setup.
Step 2: Car Exterior Assembly
With the interior complete, move on to the exterior. Begin by installing the headlights into the front bumper, attaching them with two 7mm screws each.
Attach the grill to the front bumper using two 6mm screws, then place the hood on top of the car. Open it with the hood lock, then secure it with four 6mm screws, but do not close it as it needs to stay open for later steps. To finalize this stage, insert and attach the air filter using two 6mm screws.
Continue with the exterior by attaching the left and right doors using four 10mm screws each, and the left and right fenders with five 5mm screws each. Place the boot lid on the trunk of the car, securing it with four 6mm screws.
To finalize the exterior assembly, attach the front and rear bumpers with two 8mm screws each, and install the left and right rear lights.
Step 3: Fill Up the Necessary Liquids
Now that the vehicle is fully assembled, it’s time to fill it up with the necessary liquids. Begin by opening the radiator’s cap and pouring in the coolant. However, remember not to throw out the coolant bottle as it isn’t empty.
Continue by opening the rocker cover’s cap and pouring in motor oil, again, do not dispose of the oil bottle as it still contains oil. Proceed to open any of the two brake master cylinder caps and pour in brake fluid. Unlike the previous liquids, the brake fluid bottle should be discarded as it will be empty. Repeat this process with the second cylinder cap opening.
Next, open the clutch master cylinder cap and repeat the process, but remember that the bottle will not be empty this time. Finally, fill up your gas tank by opening the jerrycan and pouring in the gas.
My Summer Car Tuning
Tuning your Satsuma in My Summer Car can significantly enhance performance or economy. Although some adjustments are straightforward, others necessitate a little more effort and skill. Missteps in tuning could cause component damage, so it’s recommended to save your game before you begin.
Each tunable part is influenced by a unique internal variable with upper and lower limits. Here are the key components you can tune, with tips on how to do it right:
My Summer Car Guide, Tuning #1: Alternator Belt Adjustment
The alternator belt’s correct adjustment is crucial to avoid snapping. To do this, unscrew the adjustment bar with a flat-head screwdriver and move the alternator by scrolling in hand mode. To stop the belt from “whirring,” loosen the belt as much as you can. This technique gives the belt its longest lifespan, although it’s inevitable that it will break at some point.
1.1 Adjusting the Alternator Belt
The correct adjustment of the alternator belt is vital to prevent it from becoming loose or snapping. If it breaks, a replacement will need to be purchased from Teimo’s shop. You can adjust the belt by loosening the adjustment bar screw with a flat-head screwdriver and moving the alternator using the scroll wheel in hand mode.
1.2 Tuning Process
Initially, with the engine off, loosen the screw and move the alternator to the far right position. Then, start the engine and shift the alternator left until a “whirring” sound begins. Slowly move the alternator right, until the noise stops. Finally, secure the alternator back by tightening the screw.
1.3 Quick Tuning Method
A faster method is to shift the alternator to the far right and then two ticks back to the left, without turning on the engine. This setting makes the belt as loose as possible without producing a “whirring” sound.
1.4 Belt Lifespan
The belt’s tightness doesn’t affect performance, but it is best to set it just beyond the point where you can’t hear the “whirring”, as this will prolong its lifespan. However, eventually, the belt will break, and this cannot be avoided.
My Summer Car Guide, Tuning #2: Tuning Stock and Twin Carburetors
Both these carburetors can be tuned similarly, ideally using an air-fuel ratio (AFR) gauge. Adjust the AFR by tightening or loosening the idle screw. A lower AFR means a richer air-fuel mixture, while a higher AFR indicates a leaner mixture. An AFR of around 13.1 is best for performance, while 14.0 to 14.5 is more fuel-efficient.
For optimal results, adjust the AFR when the car is at the right temperature.
2.1 AFR Adjustment
Both the stock and twin carburetors are tuned similarly using the air-fuel ratio (AFR) gauge, which simplifies the tuning process. Adjust the AFR by loosening or tightening the idle screw with a flat-head screwdriver. Be aware that an excessively high or low AFR may cause your car to stall.
2.2 Ideal AFR Values
For optimal performance, an AFR of 13.1 is recommended. For everyday driving, an AFR between 14.0 and 14.5 is ideal, balancing fuel economy with performance. If you opt for professional tuning services, Fleetari will adjust the AFR according to the service chosen.
2.3 Tuning Considerations
Ensure the car is at its optimal temperature before adjusting the AFR. Remember, driving at full throttle will raise the temperature, changing your AFR. Accurately determining the AFR using the gauge requires some driving in 3rd or 4th gear.
2.4 Advanced Performance Tuning
For advanced tuning, this method can be combined with a 950 PSI nitrous oxide injection and significantly skewed distribution timing. Note that this setting will reduce the lifespan of engine parts and requires significant maintenance.
My Summer Car Guide, Tuning #3: Racing Carburetors
For racing carburetors, you have to balance four screws instead of one. Tighten all four idle screws 44 times, then loosen them around 10 times to get an AFR of about 14.0-14.5. Ensure the screws are turned the same amount of times and in the same direction during adjustment.
3.1 Basic Tuning
In essence, racing carburetors are tuned similarly to stock and twin carburetors. However, with four screws to adjust instead of one, balancing can initially be challenging. For the easiest tuning, start by tightening all four idle screws at least 44 times, then loosen each about 10 times. Ensure all screws are equally adjusted to maintain an AFR around 14.0-14.5.
3.2 Advanced Tuning
Proceed with tuning the racing carburetor in the same way as you would with stock and twin carburetors. Remember to adjust all screws an equal number of times and in the same direction to maintain their identical positions.
My Summer Car Guide, Tuning #4: Camshaft Gear Adjustment
The camshaft gear is a vital component that needs correct alignment for optimal engine performance. Use a 10mm spanner to align the two notches on the gear.
4.1. Importance of Adjustment
Proper adjustment of the camshaft gear is crucial for the car’s function. Notice the two notches cut into the gear and the component to the bottom right. These notches need to be aligned.
4.2 Tuning Process
Use a 10 mm spanner on the gear bolt to align the notches once it has been properly tightened. Scrolling up rotates the gear clockwise; scrolling down loosens the bolt. The optimal setting is when both notches face each other; any deviations will result in an uncoordinated engine.
My Summer Car Guide, Tuning #5: Rocker Shaft Tuning
Rocker shaft tuning is essential for a smooth drive. It involves adjusting the valve clearance of each rocker. Best performance is achieved by keeping your valves as loose as possible. This is done by scrolling down until the screw doesn’t move anymore, then scrolling up seven times.
5.1 Introduction to Tuning
Rocker shaft tuning is a necessary, albeit laborious task, for proper car function. It involves adjusting the valve clearance of each rocker – the gap between the rocker arm and valve tip. Each cylinder has two rockers (intake and exhaust), totaling eight tunable items, all of which should be closely matched.
5.2 Valve Clearance Adjustment
Use a flat-head screwdriver to adjust a rocker’s valve clearance. Tightening the screw decreases the clearance, and loosening it increases the clearance. Metallic clicking indicates the valves are too loose or too tight. Remember, there’s no in-game visual indication of the valve clearance – only the adjusting screw itself moves during the tuning process.
5.3 Performance Optimization
For optimal performance, maximize the valve clearance, as this increases the cylinder volume for combustion. Conveniently, the adjustment screws have a visual rotation limit. Scroll down until the screw no longer moves, then scroll up seven times for the best result.
My Summer Car Guide, Tuning #6: Distributor Tuning
Tuning the distributor optimizes ignition timing. Turn the distributor clockwise to advance timing, and counterclockwise to retard it. For better performance, the distributor should be as advanced as possible without causing any “chirping.”
6.1 Distributor Adjustment
The distributor, often overlooked, can be adjusted to tune your car’s performance by altering the ignition timing. To adjust, loosen the distributor hold-down screw and rotate the distributor clockwise (advancing timing) or counterclockwise (retarding timing). If too advanced, the engine will produce a high chirping sound.
6.2 Performance Tuning
For optimal performance, advance the distributor as far as possible without pinging. First, retard the distributor until it can no longer be scrolled up, then advance it until chirping begins. Finally, slowly retard the distributor until the chirping ends.
6.3 Nitrous Oxide Performance Gains
For peak performance in Japanese 4-cylinder engines, enrich your Satsuma with nitrous oxide and significantly retard your distributor to accommodate the increased engine pressure during enrichment. This prevents damaging your pistons and losing performance. Be aware, performance will decrease when un-boosted due to the retarded ignition timing.
My Summer Car Guide, Tuning #7: Tachometer Usage
A racing tachometer enhances performance by providing a visual gauge of RPM. It also has a shift adjust knob that changes the RPM at which the gear light powers on.
7.1 Function and Adjustment
The racing tachometer provides a visual gauge of Satsuma RPM and has an adjustable gear light to indicate when to change gears, suited to personal driving tastes. A small “shift adjust” knob on the dial alters the RPM at which the light will power on.
Hold the engine RPM where desired and adjust the dial to light up at your preferred mark. Note there is no visual guide for the current RPM setting.
7.2 Extra Gauges for Performance
For absolute performance, extra gauges are recommended, bringing your car closer to mid-’90s Japanese max-attack stylings. This, supposedly, gains the favor of Godzilla, earning you additional mustache hairs and making all your 1/4 mile drag strips slightly downhill.
My Summer Car Guide, Tuning #8: Final Gear Ratio Adjustment
At Fleetari Repair Shop, you can change the Satsuma’s final drive gear ratio. Depending on your driving style and need for speed or acceleration, you can choose from six different ratios.
Remember that tuning your car can significantly impact its performance and fuel economy. Always save before making changes, and ensure you understand the process thoroughly before starting. By making thoughtful, informed adjustments, you can enhance your Satsuma’s performance and get the most out of your My Summer Car experience.
Ratio Overview
| Ratio | Notes |
|---|---|
| 3.700 | Slowest acceleration, fastest top speed |
| 3.900 | Good for highway driving |
| 4.110 | Slightly slower acceleration, faster top speed |
| 4.286 | Stock ratio, decent all round |
| 4.415 | Noticeably faster acceleration, lower top speed |
| 4.625 | Fastest acceleration, lowest top speed |
Top Speed & RPM Drop Analysis
Considering a tire size of 155/82 R12, 8000 RPM in-game rev limit, and the gearing from a 1974 Datsun 100A, we can see the top speed in each gear and RPM drop after gear change in the charts below.
Top Speed per Gear at 8000 RPM (Km/h):
| Gear | 3.700 | 3.900 | 4.110 | 4.286 | 4.415 | 4.625 |
|---|---|---|---|---|---|---|
| 1st | 62.14 | 58.96 | 55.94 | 53.65 | 52.08 | 49.71 |
| 2nd | 102.96 | 97.68 | 92.69 | 88.88 | 86.28 | 82.36 |
| 3rd | 157.63 | 149.55 | 141.91 | 136.08 | 132.11 | 126.11 |
| 4th | 228.25 | 216.55 | 205.48 | 197.05 | 191.29 | 182.6 |
| Reverse | -55.77 | -52.91 | -50.20 | -46.74 | -45.82 | -44.61 |
RPM Drop after Gear Change:
| Gear Change | RPM Drop (%) | RPM after Change (8k RPM) | RPM after Change (3k RPM) |
|---|---|---|---|
| 1-2 | 40% | 4829 RPM | 1811 RPM |
| 2-3 | 35% | 5225 RPM | 1959 RPM |
| 3-4 | 31% | 5525 RPM | 2072 RPM |
| 4-R | 100% (stalled) | 0 RPM (stalled) | 0 RPM (stalled) |
Rally enthusiasts might prefer a higher final drive ratio for faster acceleration due to limited straight-line speed. Conversely, those who prefer highway driving, fuel economy, or achieving the highest possible speed might opt for lower final drive ratios, even if it takes longer to reach top speed.
My Summer Car Guide, Tuning #9: Nitrous Oxide Kit
A nitrous oxide kit is reserved for those enthusiasts who prioritize performance above all else, disregarding the significant increase in part wear and maintenance that accompanies its use.
It’s important to note that this type of modification is not designed for endurance driving styles like rallying, due to the elevated temperatures, unfavorable air-to-fuel (A/F) ratio, and frequent repairs associated with its usage.
Extreme damage such as a broken engine block may also occur. However, the potential drawbacks can be somewhat mitigated by adjusting the pressure, using the kit only under ideal temperature conditions, and on straightaways.
Tuning for the nitrous oxide kit is relatively straightforward. A valve on the N2O tank, typically located inside the trunk, enables you to control the pressure (volume) of injected nitrous oxide during boosting. The consensus for an optimal setting is around 950 PSI, based on real-world experiences.
However, a better PSI might be achievable through thorough testing and adjusting to your specific tuning setup. Adjustments to the Satsuma’s distributor and A/F ratio may be necessary if you modify the pressure. If the bottle isn’t full, it might not reach the desired pressure until refilled.
9.1 Air Fuel Ratio
When boosting, significant changes occur in your A/F ratio, temperatures, and distributor timings. Here are a few factors to keep in mind:
- Your A/F ratio should be set to a very rich (low) setting for peak performance due to the direct replacement of air with N2O while boosting.
- Temperatures will surge, negatively affecting performance over time. Extended periods of boosting can be detrimental to both performance and engine longevity.
- Distributor timing should be greatly retarded. If you hear “chirping” during boosting, it signifies that your distributor timing is too advanced.
- Back pressure will increase. Using steel headers, a racing exhaust, and removing the muffler are recommended to optimize performance gains.
- Your parts will wear out faster, although preparing your engine to be “N2O ready” can slow this process.
My Summer Car Guide, Tuning #10: Rally Suspension
Rally shocks and struts can be tuned for either a softer or stiffer bump and rebound tolerance. While most drivers prefer a stiffer suspension, some find enjoyment in a bouncier, borderline unmanageable car, reminiscent of popular 1970s American imports.
The tuning process involves the use of a screwdriver. The blue screws regulate the bump, or the compression of the suspension, and the red screws control the rebound, or the extension of the suspension.
Tightening (scrolling up) will stiffen the bump/rebound, resulting in a hard suspension. Loosening (scrolling down) does the opposite: the suspension becomes softer, potentially turning the car into a trampoline on uneven terrains due to the buildup of kinetic energy.
The universal goal for all Satsuma setups is to achieve a suspension as stiff as possible, without causing loss of ground contact over bumps. A stiffer suspension provides improved weight control, heightened movement responsiveness, and reduces power loss.
Even rally drivers can benefit from a stiffer suspension as it helps with better weight transfers, reducing chances of sliding off-track, and increasing responsiveness for better sprint times. However, it’s important to ensure that the suspension is soft enough to maintain consistent tire-ground contact for optimal control and power.
10.1 Bump Compression
“Bump” refers to the compression and absorption of kinetic energy by the suspension coils. Generally, bump compression should be as stiff as possible without causing the car to launch upwards after hitting a bump. This value depends on individual driving styles and needs careful testing.
It becomes evident when the tuning is way off as the suspension will likely be dislodged after a rough ride. Tarmac attack drivers might benefit more from stiff bump compression compared to Suomi rally pros due to the risk of lift-off during long corners caused by the rally suspension’s elevated height.
Bump too soft:
- Weight shifting is slow and heavy
- Decreased acceleration and braking responsiveness
- Car becomes bouncy
Bump too hard:
- Loss of traction over sharp bumps
- Lift-off during long corners
10.2 Rebound Compression
Rebound compression is the extension of the dampeners back to their original position as energy is dispersed. This setting should always be higher than the bump compression; otherwise, the absorbed energy will cause uncontrollable wheel bounce as the energy is released.
A stiffer setting increases power responsiveness and helps avoid a bouncy car, but an overly stiff setting can lead to a loss of control over even small road bumps, affecting acceleration, and braking, and significantly reducing cornering ability.
This setting might have a more substantial effect than bump compression for rally drivers, especially on the bumpy tarmac like the town of Peräjärvi.
Rebound too soft:
- Uncontrollable bounce
- Unpredictable oversteer and understeer
Rebound too hard:
- Loss of traction over sharp bumps
- The car becomes sloppy with rapid terrain changes
My Summer Car Troubleshooting
If you’re having issues with your car before, during, or after the building process, here are some troubleshooting steps for you to consider…
My Summer Car Guide, Troubleshooting #1: Issues During the Building Process
Here are some problems (and solutions) that you might encounter during the building process:
1. Cannot Attach a Specific Part
If you are struggling to attach a specific part, it could be due to a bug. Save the game, exit, and then reload it. Alternatively, the part you are attempting to attach might require additional assembly first. For example, the halfshafts will need disc brakes before attachment.
2. Cannot Locate a Specific Part
If you can’t locate a specific part, check for game updates. Updates may have moved the part’s initial position. If you suspect the part has fallen through the game’s terrain, look for it at the landfill site.
3. Liquids Not Staying in Reservoirs
If the car fluids are not staying in their reservoirs, inspect for a loose or untightened bolt in the car. Make sure every bolt is tightened.
4. Car Sparks or Catches Fire While Installing the Battery
Sparks or fires can occur if the battery’s negative side is tightened before the positive side. Always ensure the negative side isn’t bolted on its own to avoid an electrical fire.
My Summer Car Guide, Troubleshooting #2: Issues When Trying to Start the Car
Here are some problems (and solutions) that you might encounter while trying to start the car:
1. The Car Makes No Sound
The silence could be due to improper wiring. Review the wiring checklist and ensure no wires are missed. Also, check the battery, starter, and the bolts that attach them. A dead or improperly attached battery could be the cause.
2. The Car Cranks but Doesn’t Start
Check the fuel tank. It may be empty due to untightened bolts or lack of fuel. Additionally, inspect the spark plugs and the rocker shaft.
3. Car Starts but Doesn’t Stay On
Check the spark plugs and ensure they are tightened. The car might also require tuning. Pull out the choke, press the throttle (avoid redlining), and wait for the engine temperature to reach 80°C.
My Summer Car Guide, Troubleshooting #3: Issues After Starting the Car
Meanwhile, here are some problems (and solutions) that you might come across after starting the car:
1. High-Pitched Chirping Sound
This could be due to an improperly tuned distributor. Refer to a tuning guide for proper adjustments.
2. Constant Clicking Sound
This noise could indicate that the rocker valves were adjusted improperly. They should be reset.
3. Clonking Sound
A clonking sound can mean the camshaft was tuned incorrectly during assembly. Stop the car immediately to avoid further damage.
4. Gunshot Sound
This sound could suggest an excessively lean air/fuel ratio, an improperly aligned camshaft gear, or an improperly warmed-up vehicle.
My Summer Car Guide, Troubleshooting #4: Troubles During and After the First Test Drive
On the other hand, you might only notice these problems (and their solutions) after a proper test drive:
1. White Particles Emitted from Engine Bay
These particles indicate the radiator’s struggle to keep up with the rising engine temperature, likely due to prolonged, full-throttle operation.
2. The Car Veers Left/Right on Its Own
Check the wheel alignment and suspension. A guide for the alignment is available on the game’s official page.
3. Gears Change on Their Own
Loose or unbolted parts affecting gearbox behavior could be the culprit. Refer to the checklist to double-check the bolts.
4. The Car Moves Sluggishly
Improperly tuned parts or untightened spark plugs could cause this issue. Use the appropriate guides to tune the rocker shaft, carburetor, and distributor.
My Summer Car Guide, Troubleshooting #5: Problems After Long-Term Use
Here are a few other issues (and their respective solutions) that you might only notice after using your car for longer:
1. Violent Shaking
Shaking could mean the crankshaft is about to break. Consider purchasing a new one or servicing the existing one.
2. Smoke from the Engine Bay
Smoke could indicate a near-broken head gasket. Purchasing a new one or servicing the current one might be necessary.
3. Red Dashboard Light at Low RPM
A lit red light means the alternator or water pump is almost broken. Replace them or get them serviced.
4. Squealing Sound
A squealing sound might indicate a loose alternator belt. Tighten it with the appropriate tools, or consider the possibility of a broken water pump.
5. Car is Underpowered and RPM Fluctuates
Cracked piston heads letting oil into the fuel mixture, almost broken spark plugs, or a near-broken fuel pump could cause these symptoms.
6. Car Cranks and Shuts Off
This might indicate a broken starter. Consider servicing or replacing it.
7. The Car Overheats
Regularly check and fill up the radiator and oil levels. Replace or repair overheating parts at the repair shop as needed.
8. The Car Veers Left/Right
A damaged suspension could cause this issue. Consider a suspension straightening service at the repair shop.
9. The Car Brakes Poorly
Poor braking could be due to almost depleted brake fluid. Consider filling up the reservoir.
10. Car Struggles to Maintain RPM or Refuses to Start
This could be due to an empty fuel tank or a broken fuel pump. Use a full jerrycan to refill the tank or tow it for repairs.
Your journey with “My Summer Car” is sure to have bumps along the way, but remember that each hurdle is a learning opportunity. Happy gaming!
How to build your first car in My Summer Car
- My Summer Car is a simulation game in which players build their cars from various parts and try to survive the Finnish summer while maintaining the car’s integrity.
- To prepare for building your first working car, it is best to stock up on resources such as money, a fan belt, motor oil, and coolant.
- Steam user Necronomicron suggests buying everything on the left side of the store.
- To work on the car frame, the first step is to jack the car up using the floor jack and head over to the toolbox to get the necessary tools.
- There is a specific order in which to attach parts when building the car. For example, the subframe and wishbones are attached with 10mm screws.
- The rear suspension parts include trail arms, coil springs, shock absorbers, drum brakes, and rear wheels.
- The engine building process involves building the block, crankshaft, main bearings, and pistons.
- After building the engine, the next step is to install it by hoisting it and aligning it properly with bolts.
- To build the car interior, attach the dashboard, dashboard meters, gauges, and seats.
- The final step is to add all external features such as doors, headlights, and bumpers, and adjust the wheels before driving.
My Summer Car Guide: In Conclusion…
If you’ve spent all those hours putting everything together, then good news, you’re very nearly at the end of our My Summer Car guide. What you’ll have to do now is fill up the Satsuma with all its fluids. This goes for fuel, brake and clutch fluids, coolant, and engine oil.
Now it comes time to turn the ignition on and let the engine run in for a little while. Be mindful to not let it overheat or over-revving the poor Satsuma once it gets the maiden start.
You can then check and see if everything is properly attached to something else. Hear any odd noises or notice bits falling out? As with any actual car, you can feel these problems happening in real-time. If this is the case, then you’ll have to diagnose it step-by-step.
Of all the things we’ve learned in our My Summer Car guide, this is a surprisingly challenging and fulfilling game. Should you follow all these steps correctly, you have our permission to have fun in your new-old Datsun.
If you are into driving games. Then you might want to consider Fortnite also. Here is a list of all the cars available in Fortnite.
FAQs On My Summer Car
If you’re still curious to learn more in our My Summer Car guide, our FAQs here might help…
My Summer Car How To Drive Van
Before you start building a car, the first crucial step in getting up and running in My Summer Car is getting a van. Specifically, a Hayosiko Pace that’ll spawn by Uncle Kesseli’s house, near where the player’s home is. In a note left by the player’s parents, they mentioned that you can borrow Uncle Kesseli’s van. To do so, just knock on Uncle Kesseli’s front door, and speak to him briefly before he hands over the keys to the van. Know that once you get inside the van and drive off, there’s a countdown timer that’ll tell you when you need to return the van back to Uncle Kesseli. Having the van with you is important, as the main town is quite far away. And, if you plan on building your car, you could fit most of the stuff you need in the back of the van.
My Summer Car How To Build Car
To build a car in My Summer Car, you’ll first have to get all the parts necessary. Some of these components are already available in your garage. Meanwhile, others need to be found elsewhere in the world or could be bought at Teimo’s shop. Our detailed My Summer Car guide up above will provide all the necessary steps and procedures that you’ll have to go through to fully build your car from the ground up. In short, you can start by assembling together the engine. This is a fairly detailed section where you’ll need to put the engine together piece by piece. Once that’s done, you can move on to sorting out the chassis, suspension, steering, transmission, wheels, and electrics. Only after that’s complete can you move on to exterior trim pieces, interior, seats, other accessories, and so on.
How To Do Wiring My Summer Car
In My Summer Car, there are a total of 26 wires (as part of the main wiring harness of the car) that you’ll have to connect. It’s a good idea to have the wiring mess generally mounted inside the vehicle before you start installing any other electrical components. Once that’s done, you can slowly start plugging in all 26 of those wires from the wiring mess. Attaching the wires together is as simple as holding and hovering the wiring mess over a connector to a particular component. Then, press the F key (by default) when a checkmark icon appears. You could then repeat this process for every available electrical connector. They don’t need to be attached in any set order, nor would the game allow you to connect the wires incorrectly. After the wires are all connected, you can then connect them to the battery.
My Summer Car How To Order Parts
If you need to order parts for My Summer Car, head over to the garage, and you should be able to find the AMIS Catalog. Otherwise, there are other such magazines or catalogs elsewhere around the map, like at Fleetari’s workshop. These might contain other unique parts that you can’t order from the AMIS Catalog, but the latter should contain most of what you need. To order a part, browse around the catalog and find the part(s) you need. Then, click on a particular part and this will fill in an order form. Once you’re done, click on the ‘TILAA NYT!’ button (aka Order Now!), and an envelope will spawn. Next up, take this envelope to the main town, and place it in the mailbox next to the store. Soon, a clerk informs you that the parts are in, and you can pick them up.
My Summer Car How To Repair Body
My Summer Car is quite realistic in many ways, including how any damage appears on your car. If the bodywork is all dented and scratched up, it’s thankfully rather easy to have it repaired. First, you’ll need to head down to the town of Loppe, and find the local mechanic there. Drop off your car, and a checklist will appear. This would ask you what parts of the bodywork do you want to be repaired. Fill in the checklist as you see fit, but be wary that it can get rather expensive. Once you’ve made the necessary payment, leave your car there. In a week or two, the mechanic will call you once the repair work is done, and your car is ready to be picked up.
How to Start a Car With a Bad Starter
If you’re dealing with a bad starter, you can sometimes bypass the issue with a bump start or push start. Put your car in second gear, and switch the ignition to on. Then, have someone push the car forward until it reaches about 5 mph. Once at that speed, release the clutch quickly. The engine should jolt to life as the car’s momentum turns the engine.
How to Build a Car
Building a car is a complex process, involving several steps. You start by assembling the chassis, followed by the engine and transmission. After this, you install the suspension and brake systems. The car’s body is then fitted onto the chassis. Finally, you install the electrical systems and the interior. Each step requires precise tools, technical knowledge, and time.
How to Build an Engine
To build an engine, you start by assembling the block and crankshaft. Then, install the pistons and connect the rods. Mount the cylinder heads and install the camshaft. Place the timing components and set the engine timing. Install the intake and exhaust systems. Last, install the valve covers and oil pan. Always follow the manufacturer’s instructions to ensure all parts fit together properly.
Which Side of Battery to Connect First
When connecting a car battery, always connect the positive cable first. It’s typically red and has a plus sign. After the positive cable is secured, you can connect the negative cable, which is usually black and marked with a minus sign.
Does a Sub Panel Need a Ground Rod
Yes, a sub-panel should have its own ground rod. The ground rod creates a path to the earth, which can help prevent electrical overloads or faults. It’s crucial to follow all local electrical codes and regulations when installing a sub-panel and ground rod.
How Long Does It Take to Assemble a Car
The time it takes to assemble a car can vary widely. For a large auto manufacturer, it may take around 24 hours to assemble a car. However, if you’re building a car by hand at home, it can take several months or even years, depending on your skills, tools, and the complexity of the project.
How Long Is a Wheel Alignment Supposed to Last
A wheel alignment should last anywhere between two to three years, or after driving 24,000-30,000 miles, whichever comes first. However, if you drive often on rough roads, hit a curb, or are in an accident, you might need an alignment sooner.
Why Does My Car Shake When I Hit the Brakes
If your car shakes when you hit the brakes, it could be due to warped brake rotors, worn-out brake pads, or loose components in the suspension system. It’s important to have this checked by a professional, as it could affect your vehicle’s safety on the road.
Where Is the Car Starter Located
The car starter is typically located on the underside of the vehicle, near where the engine and transmission meet. However, the exact location can vary based on the vehicle’s make and model.
What to Do After Adding Brake Fluid
After adding brake fluid, you should test your brakes to ensure they’re working properly. Start your car and press down on the brake pedal. If it feels firm and not spongy, your brakes are likely fine. If the pedal feels soft or sinks to the floor, you may have air in the brake lines and should bleed the brakes or have a mechanic check it out.
How to Get Rid of Play in Steering Wheel
To get rid of play in the steering wheel, first identify the cause. Common culprits include worn steering gear, loose steering linkage, or problems with the wheel bearings. Once you’ve found the cause, replacing or repairing the worn parts should remove the play in the steering wheel.
How to Set Diesel Injection Pump Timing
Setting diesel injection pump timing involves finding the top dead center on the number one cylinder, then adjusting the injection pump to the manufacturer’s specifications. This task requires specialized knowledge and tools. If you’re not confident, it’s best to take it to a professional.
How to Build the Car in My Summer Car
In My Summer Car, building the car starts by assembling the subframe with the wishbones, spindles, and disc brakes. Then install the engine, exhaust system, and clutch master cylinder. Connect the halfshafts, and install the gear linkage, handbrake, and fuel tank. Install the body, wiring mess, and the rest of the parts according to the instructions in the game.
How to Build an Engine from Scratch
Building an engine from scratch requires careful planning and precision. Start with the engine block and install the crankshaft. Then install pistons, connecting rods, and cylinder heads. Install the camshaft and set up the timing system. Install the intake manifold, carburetor (or fuel injection system), and exhaust headers. Finally, install all accessories and wiring as per the manufacturer’s instructions.
How to Play My Summer Car
My Summer Car is a survival game focused on building and maintaining a car. The game starts with the player in a garage with various parts to assemble a car. Use the provided tools to assemble the car and keep your character’s needs (hunger, thirst, fatigue, and dirtiness) satisfied. You can explore the game world, interact with other characters, and perform various tasks to earn money.
What Happens if Your Exhaust Pipe Falls Off
If your exhaust pipe falls off, your car will likely become louder, as the exhaust gases aren’t being directed away as efficiently. You might also notice a decrease in fuel efficiency. Most importantly, there’s a risk of dangerous exhaust gases entering your car’s cabin. You should get it repaired as soon as possible.
How Long Does It Take to Build a Car from Start to Finish
Building a car from start to finish depends on the complexity of the car and the builder’s skills. Auto manufacturers can complete a car in about 24 hours. However, if you’re building a car yourself, it might take several months to years, depending on the time you can dedicate to the project.
My Summer Car Where Is the Store
In My Summer Car, the store is located in the nearby town of Peräjärvi. You can find it by leaving your home, turning right at the end of the dirt road, and following the highway. The store is where you can buy food, drink, and other essential items.
How to Get the Van in My Summer Car
To get the van in My Summer Car, you need to win the house in a card game against the man in the pub. Once you’ve won, the keys to the van will be inside the house. This van can be very useful for carrying large items.
Where Is Car Starter Located
The car starter is usually found on the underside of the vehicle, near where the engine and transmission connect. The exact location can vary based on the car’s make and model.
How to Remove Alternator Clutch Pulley Without Tool
To remove an alternator clutch pulley without a tool, you can try using a strap wrench to hold the pulley and a socket to loosen the bolt. However, this can be challenging and may not always be successful. It’s generally recommended to use a specialized pulley removal tool.
How to Enter Driving Mode in My Summer Car
To enter driving mode in My Summer Car, approach the vehicle’s driver’s side door, open it, and then press the ‘Enter’ key to get in. Once inside, press ‘Enter’ again to switch to driving mode. From here, you can start the car and begin driving.